January 23, 2018
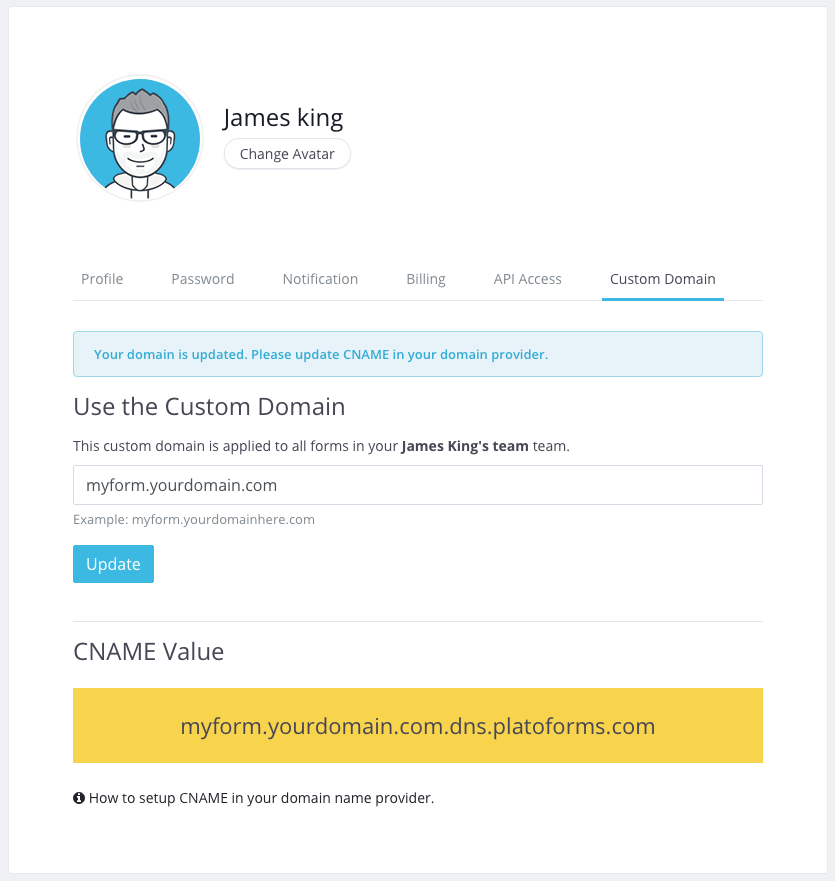
Use a custom domain name for your forms
You can now share your forms using your own domain name—also known as a Custom Domain or Domain Name Masking.
For example, instead of using the default URL:
https://form.platoforms.com/frcaserswr
you can set it to:
https://sales.yourdomainhere.com/form/frcaserswr
This instantly removes platoforms.com from the URL and gives your form a fully branded, professional look.
To enable this feature, you’ll need to:
- Own a domain name
- Have access to update its DNS settings (specifically adding a CNAME record for your subdomain)
Once you’ve added the CNAME in your DNS provider, PlatoForms will automatically install an SSL certificate for your custom domain. Thanks to Let’s Encrypt, the certificate is completely free, and we handle the entire setup and renewal process for you.
For setup instructions, visit Custom Domain.
December 12, 2017
A new way to present your PDF Form Online
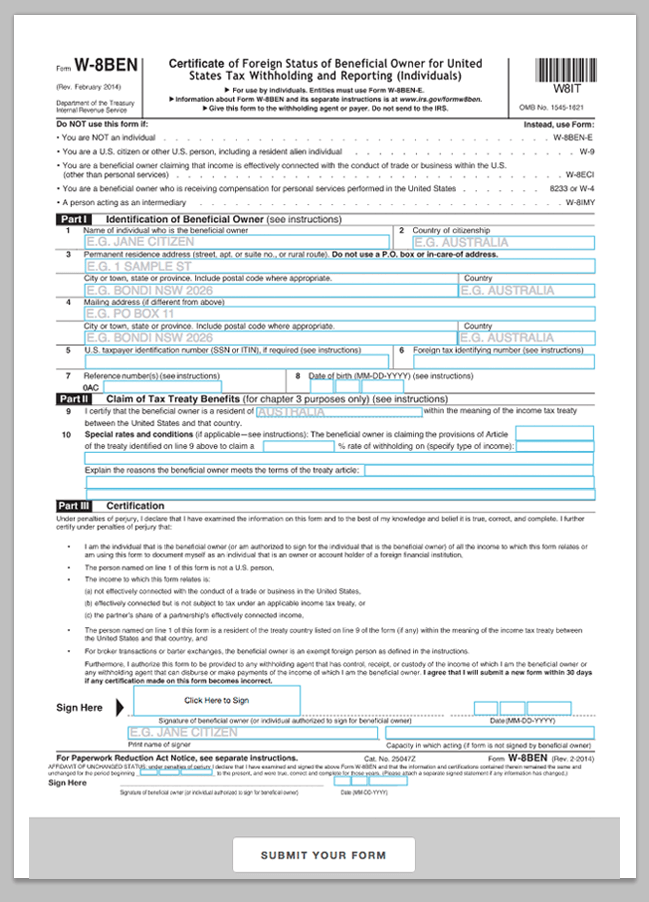
You’re already able to turn a PDF into a Web PDF Form, which lets people fill it out online just like a normal form. However, creating this type of form can take time, especially when the PDF is long or complicated.
Now there’s a simpler option. With our new Online PDF Form mode, you can drag and drop fields directly onto your PDF to make it fillable. If your PDF already contains form fields, we’ll detect them and build everything for you automatically.
Once finished, you can publish the form as a web page, embed it on your website, or share a link. Your users just open the page, fill it out, and submit—no downloads needed.
Web PDF Form
A Web PDF Form converts your PDF into a responsive online form. It loads quickly, works on all browsers, and is very mobile-friendly. It takes a bit more setup because you need to configure both the online form and the PDF mapping.
Online PDF Form
This option keeps your original PDF layout exactly as it is. You simply add fields on top. It’s faster to build and great for complex PDFs. It works in all modern browsers (Chrome, Safari, Firefox, Edge) but not Internet Explorer. Very large PDFs with many images may load slightly slower.
One More Thing
Don’t have a PDF yet? You can create one from scratch with our PDF Maker. Add text fields, dropdowns, signatures, and more, then convert it into a Web PDF Form or Online PDF Form with one click.
You’ll still need to map labels to the online form, but the rest is handled for you.
Learn more in Online PDF Form Builder.
September 1, 2017
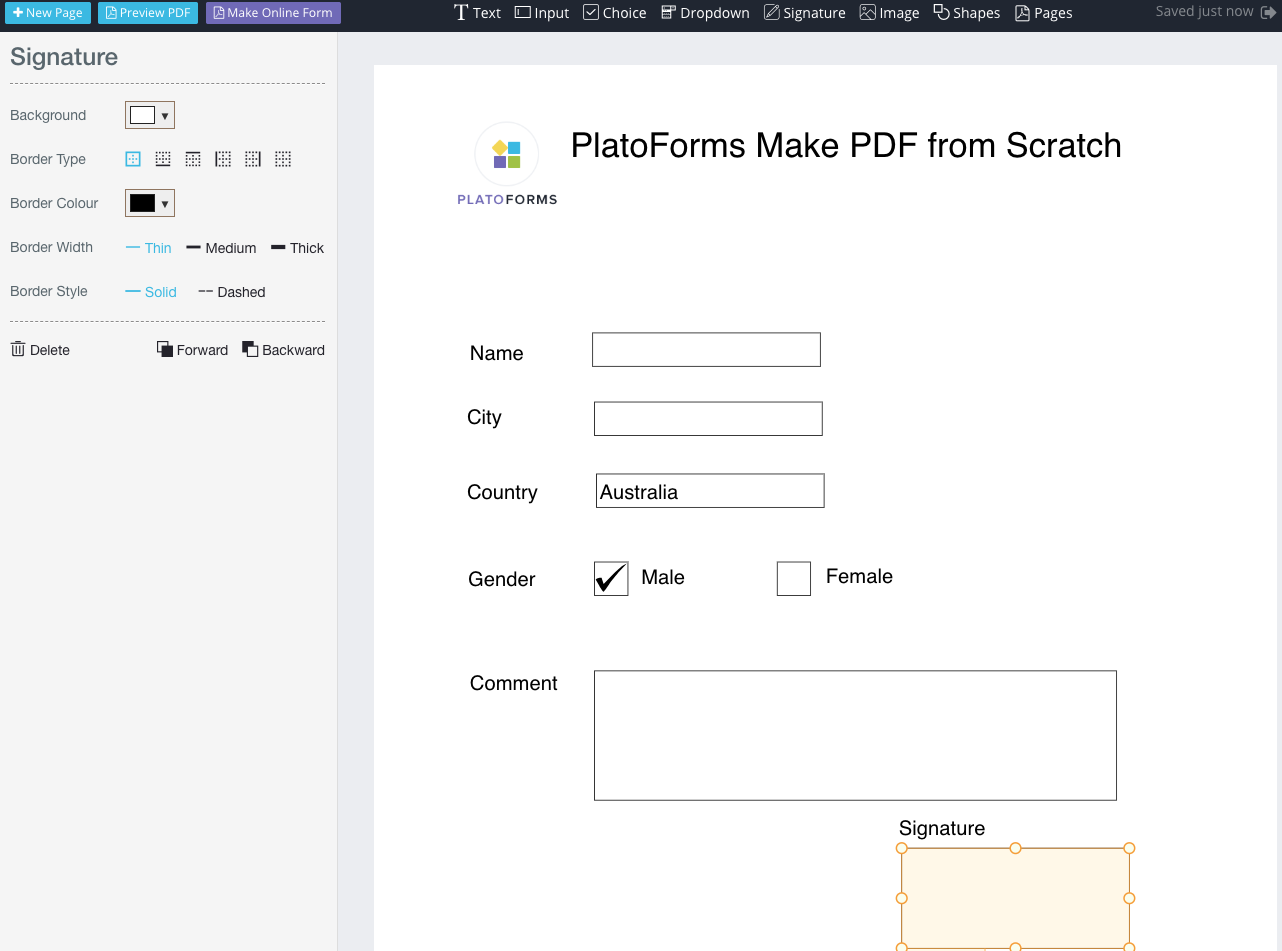
Create PDFs from scratch
PlatoForms can now create fillable PDFs from scratch. Our PDF Maker is a drag-and-drop editor that lets you build a PDF layout easily. It supports multiple field types—text inputs, choices, dropdowns, signatures, and more—each with fully customizable properties such as font, size, color, borders, and background.
PDFs created in the editor start as read-only. To make them fillable, simply click Make Online Form in the toolbar. PlatoForms will automatically convert your PDF into an online form, mapping each PDF field to its corresponding web form field. When the conversion is done, you just need to bind labels, help text, or placeholders. To save time, we auto-suggest these values based on text detected inside your PDF.
You can create unlimited PDFs, and this feature is completely free.
Learn more in PDF Maker.
August 15, 2017
Improvement of form usability
With our form builder you can create a form easily. But this is far from enough if you just simply append various input widgets into a form. Here we introduce some tips to improve the usability of your form, which will help your customers complete it more efficiently. This also makes your collected data more accurate.
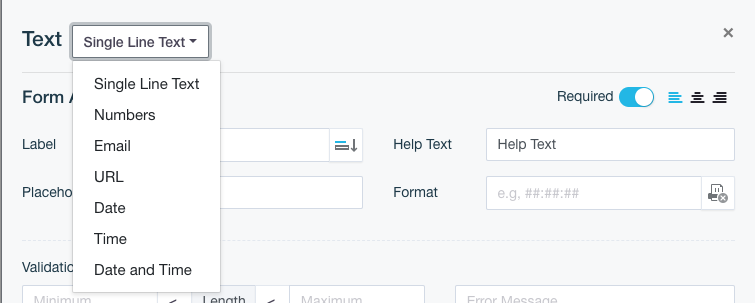
Use a different sub-type for Single Text
In a single line text input dialogue, you can choose the sub-type, e.g. number, email, date, date and time, URL, etc. Once you choose the sub-type, the input text is restricted to this particular type. For example, if you want to ask for the user’s email, the email sub-type will ensure that only the email addresses are accepted.
Single Choice Vs. Multiple Choice
If your PDF has options, the Choice widget is made just for that purpose. Depending on your requirements, you can set it as single or multiple choices. For example, in a car sale contract PDF there are two options: a one-month warranty or a three-month warranty. Obviously, the customer can only choose one of them. In this case, Single Choice is definitely the correct choice. You simply add the choice item – i.e. 1-month warranty and 3-month warranty – and turn off Multiple Choice. After that, your form only accepts users making one choice from the warranty options.

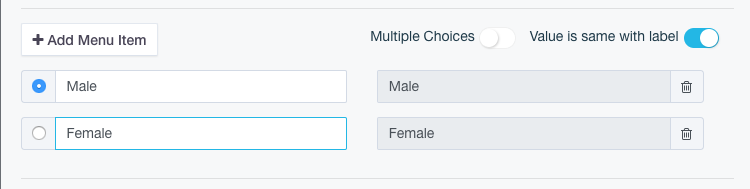
Use Dropdown
You can use the most common scenarios for the dropdown options, for instance if the text input is Gender, City, Language, etc. which have only limited selections and you want the PDF to have consistent text. For example, you may put Female or Male as dropdown options in the gender box. If the form uses single line text, you may get various different inputs, such as, man, woman, boy, etc. That may be harder to work with as data and not what you were wanting..
Required Or Optional
All form widgets have this option. They automatically default to YES, meaning that your customer must fill in the field. However, in some cases, you may consider turning this off to make the field optional.

Add Validations
In Multiple Line Text or Single Line Text, you can add some validations to restrict user input. The most common case is maximum or minimum length. This helps you to control what the user inputs in line with your expectations. We will give more details about validation in the next blog post.

You can find more details in Field Properties.
August 10, 2017
Export Form Submissions
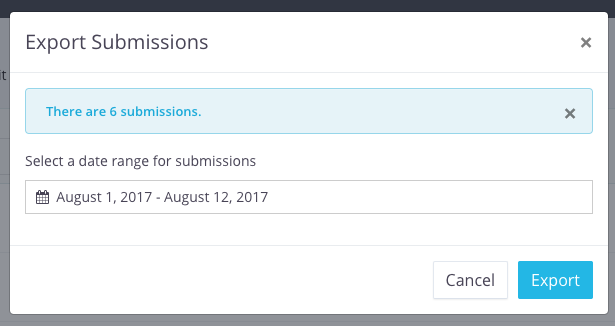
Whenever a customer submits a form, you’ll receive an email with the generated PDF. You can also review submission data, download PDFs, or re-generate them anytime from the Submissions page — and now, you can export all submission data as well.
To export, simply click Export Submissions and choose a date range. Before downloading, the system will show how many submissions fall within that range. Click Export, and a ZIP file will download within seconds.
The ZIP file contains one or more CSV files. If your form has multiple revisions (for example, if you published updated versions over time), each revision will have its own CSV file. Every CSV includes the raw submission data, including the generated PDF URLs — making it a simple alternative to using the API for importing data into your own system.
You can open CSV files with any text editor, Excel, or macOS Numbers.
For more details, see Export Form Submissions.
July 31, 2017
Web form designer
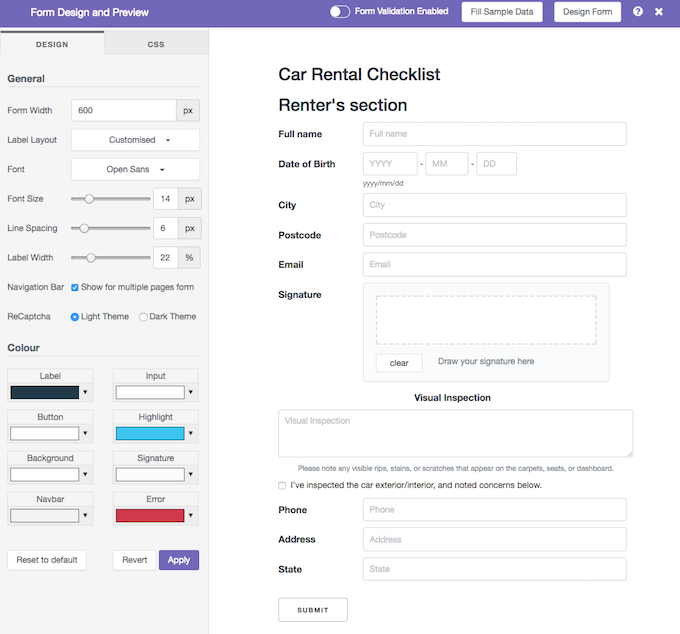
We’re pleased to announce the release of our Form Designer! With this feature, you can easily customise your form’s colours, fonts, sizes, layout, and more. It also supports embedded CSS if you want full control over your form’s look and feel.
To access it, open the Form Builder and click Preview Form on the top bar. In the preview window, select Form Design in the top-right corner. The designer appears as a sidebar on the left, and any changes you make are instantly reflected in the live preview. When you’re happy with the new design, click Apply to save it. Existing published forms won’t change until you republish, so you can refine the design safely without affecting your users.
The Form Designer has two tabs:
- Design — covers most layout and styling needs.
- CSS — for advanced customisation by adding your own stylesheet. CSS applied here overrides default styles.
For more details, see our full guide on the Form Designer.
July 28, 2017
Checkbox Vs. Radio Button
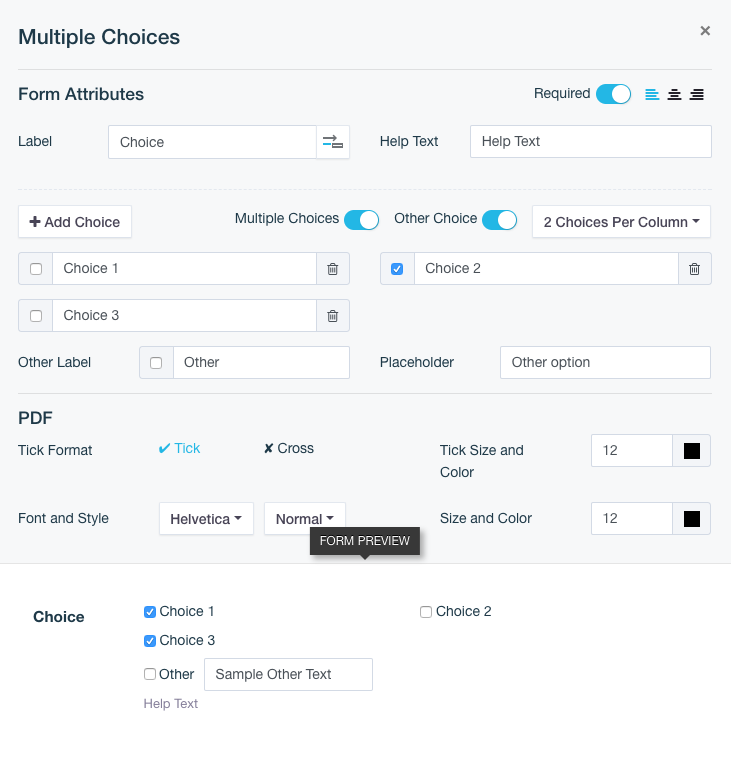
In a PDF, you usually need a tick or cross to mark selections. Choice is the proper widget to fit in. There are two kinds of Choice: one is Checkbox, which allows multiple selections, and the other is Radio Button, which allows only one selection. From its properties dialogue, you can turn on/off the Multiple Choices option to switch between easily.
Press Add Choice to add more items. Each item has a draggable square widget in the right-hand side PDF panel, just drag it to the proper location in your PDF. In the web form, each Choice item has a different label to tell what this option is for. Once it is selected in the web form, a tick or cross is rendered into your PDF at the location you dragged.
With the Other Choice option you can add a text box in the web form, which is rendered as text in your PDF.
For more details, please check out Choice Properties.
July 23, 2017
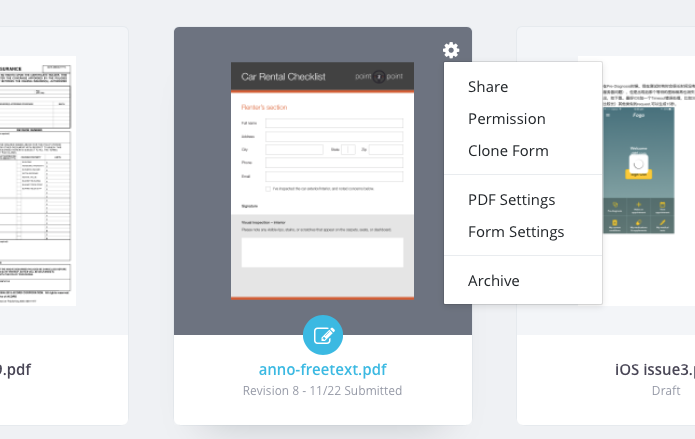
Clone a form
Save time on form creation! The “Clone” function duplicates existing forms effortlessly, allowing you to make minor changes like adding or removing fields or adjusting the layout without starting from scratch.
Once cloned, your new form inherits all fields, logic, and settings from the original. Need to add a new Text Input field? Simply insert it in the form builder, drag it to the right spot in the PDF, and effortlessly publish the updated version. Form editing made easy!
For more details, please check our user documentation.
July 16, 2017
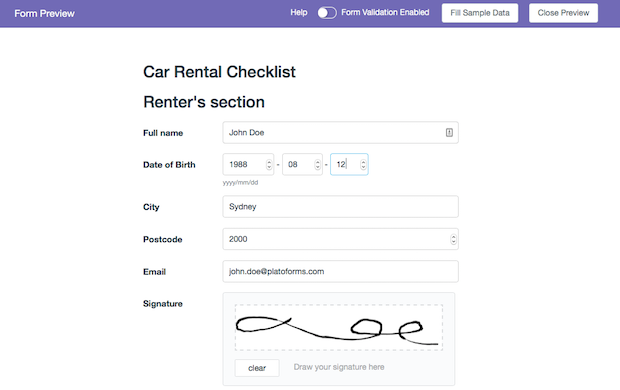
Preview with sample data
We’re excited to introduce a time-saving feature in our Form Builder! Now you can effortlessly streamline your preview process by prefilling specific fields with sample data.
For example, when building a form, inputting “John Joe” into the “Text Input” field for the name allows you to automatically fill that field with just one click of the Fill Preview Data button during the form preview. This not only enhances efficiency but also facilitates the swift preview of generated PDFs after form submissions.
Your pre-set sample data seamlessly integrates into the PDF preview when you click Preview PDF, providing a comprehensive snapshot of the submitted information.
Please note that certain fields, such as File Upload or ReCaptcha, require manual completion and cannot be pre-filled.
For more detailed instructions and insights, refer to our user documentation. Upgrade your form-building experience today!
June 1, 2017
Introduce API Version 1
Say hello to our first-ever PlatoForms API—designed to help you access your data effortlessly and automate workflows with ease.
✨ Highlights:
-
Easy Data Access: Retrieve form details and submission data programmatically with simple API calls.
-
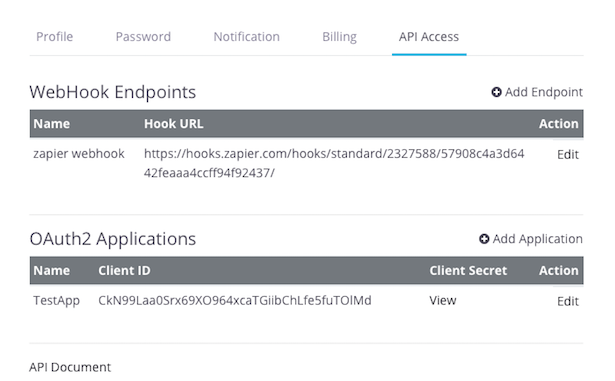
Real-time Webhooks: Get instant notifications whenever a form is submitted, including direct PDF links.
-
Secure OAuth2 Authentication: Protect your data with OAuth2. Generate your Client ID and Client Secret right from your dashboard.
-
Customizable Webhook Events: Monitor submission events and tailor Webhook behavior based on your needs.
-
Clear Documentation: Visit our API documentation for detailed guides and examples.
-
Available on All Plans: API and Webhook access are included in every plans — with volume limits depending on your subscription tier.
-
Free for Trial Users: Even trial accounts can start using the API and Webhooks at no extra cost.
Want to learn more about OAuth2? Check out this helpful introduction.