Commonly used form logic
Tabs
In this chapter, you’ll learn how to use different types of conditional logic to control field behavior, navigation flow, data, and PDF output.
Before you begin
Before you dive into form logic, it’s important to understand how to add fields and access the panel for setting logic:
- To add fields, refer to the Add form fields section.
- To access the logic panel, refer to the Set logic for your form section.
Control field behavior
Use logic to control what users see and interact with. Available actions:
| Action | Description |
|---|---|
| Show / Hide | Control whether a field is visible |
| Enable / Read-only | Control whether a field can be edited |
| Required / Optional | Control whether input is mandatory |
These actions are commonly used in scenarios like showing or hiding fields based on user input.
Show or hide fields in the form
| Description | Scenario |
|---|---|
| Allows your form to show or hide fields based on user input. | Imagine you’re designing a customer purchase form. If customers have a discount code, they must enter it for validation. Otherwise, the input field remains hidden. |
Follow these steps to set up the form logic:
-
Add the fields:
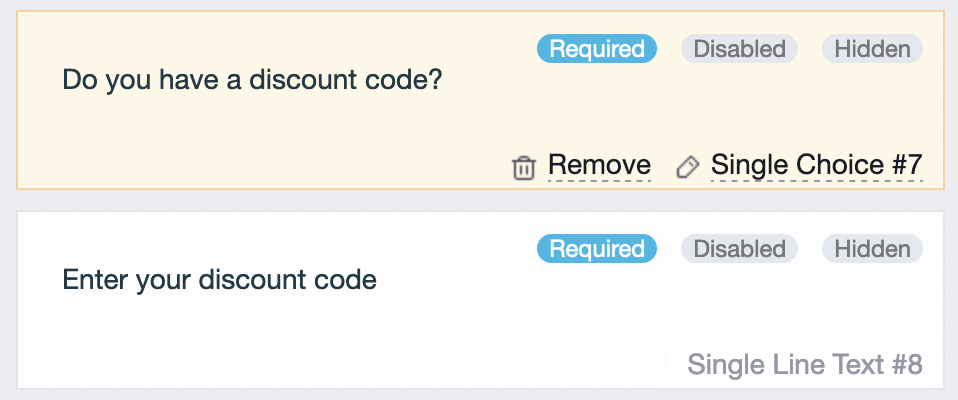
- Add a Choice field (#1 Do you have a discount code?) and set it as a single-choice field with options “Yes” and “No.”
- Add a Text Field (#2 Enter your discount code).
NoteFor the field #2, you can select a Text Input type, like Number, and configure the validation, such as limiting it to less than 8 digits, according to your needs.
-
Apply the following logic to the fields:
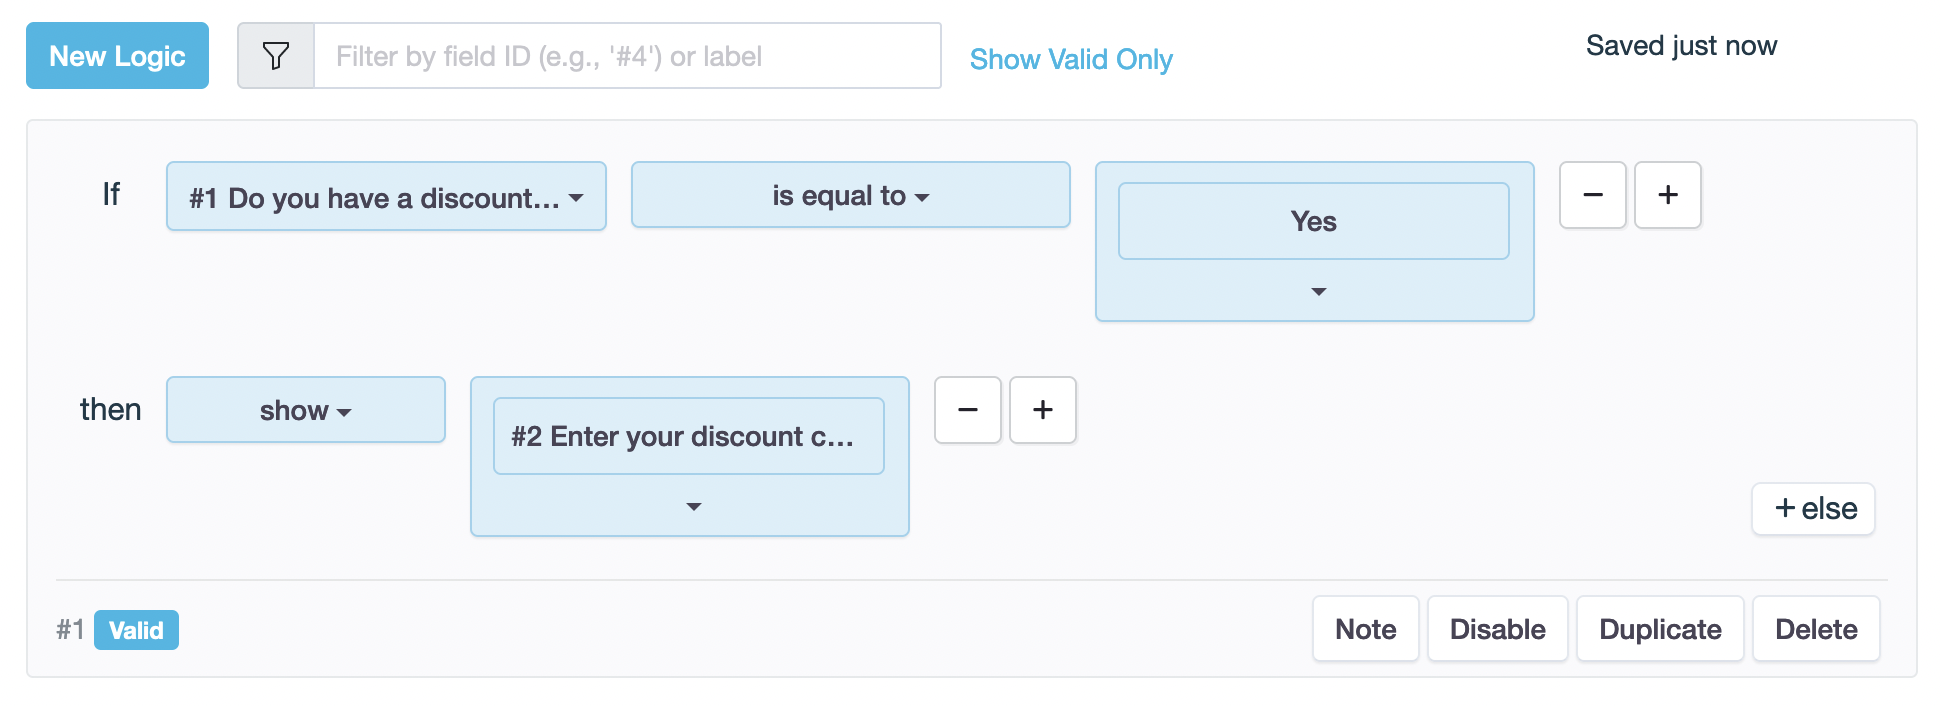
- Set condition: If #1
is equal toYes - Set action: then
Show#2
- Set condition: If #1
Understanding the Difference: “Show” vs. “Enable”
- Show: Makes a field visible
- Enable: Allows user interaction
Preview
When the user clicks “Yes”, the #2 field appears, and they can fill in the discount code.

Control navigation flow
Use logic to guide users through different paths in your form. Available actions:
| Action | Description |
|---|---|
| Jump to page | Redirect users to a specific page |
| Exit to page (no submit) | Exit the form without submitting |
Page navigation (Skip pages)
| Description | Scenario |
|---|---|
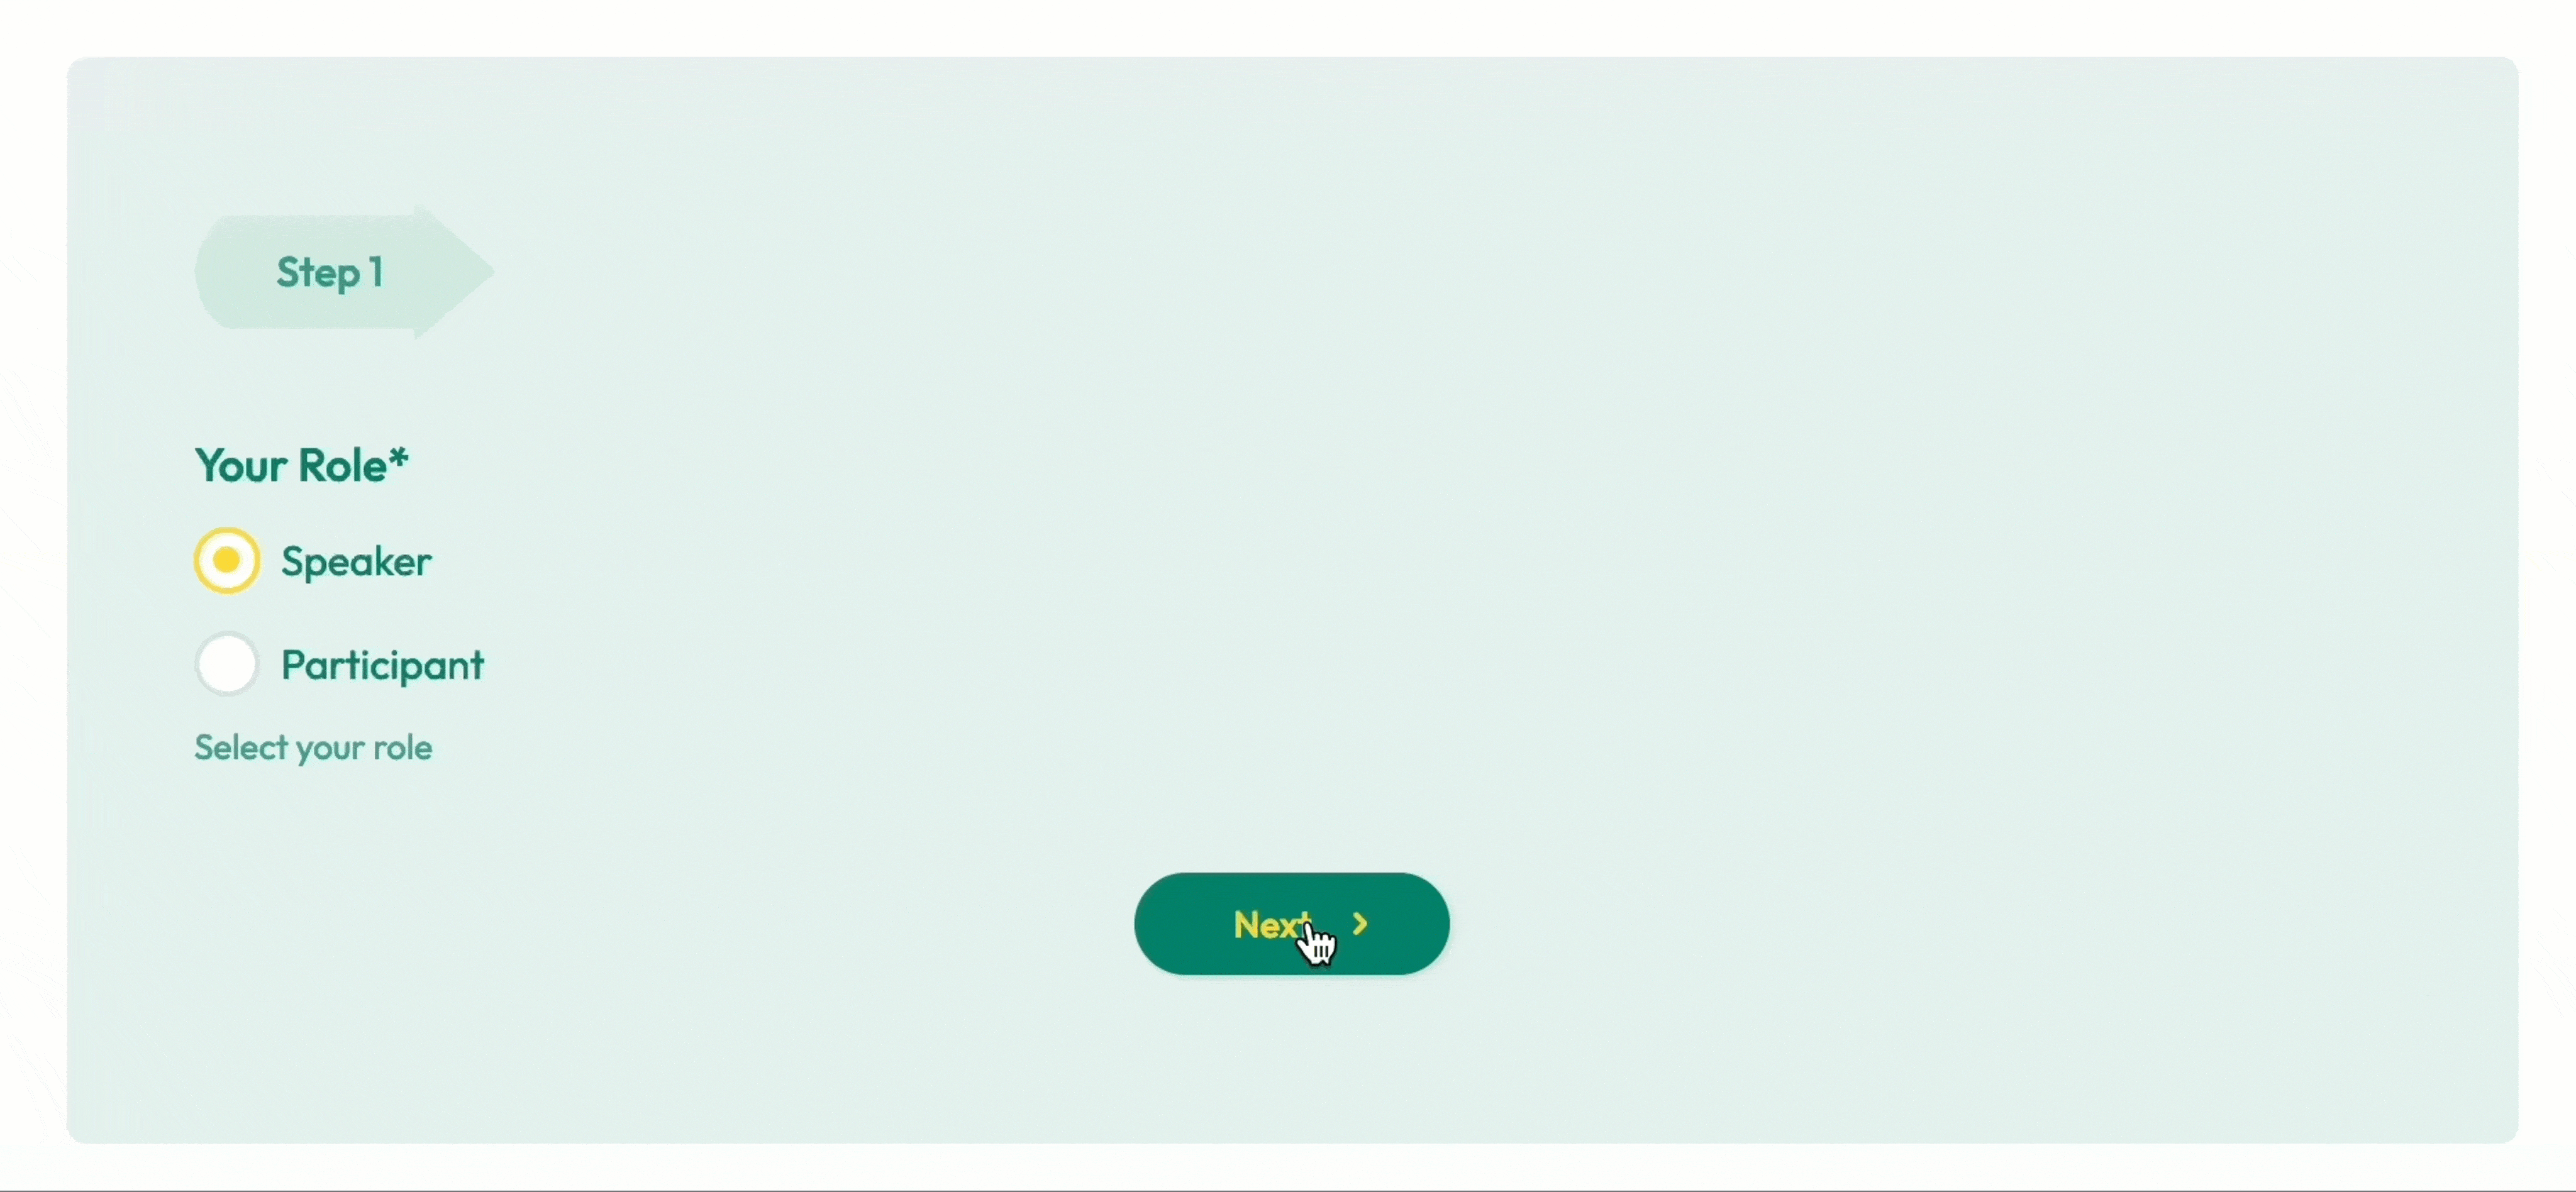
| Allows your form to skip irrelevant pages for users. | Imagine you’re creating an event registration form. If the user selects “Speaker,” they’ll be directed to a page with speaker-specific questions. If they choose “Participant,” they’ll skip to a different page. |
Here’s how you can set it up:
-
Add a Choice field (#1 Your Role) to capture the user’s role, and set it as a single-choice field with options such as “Speaker” and “Participant”.

-
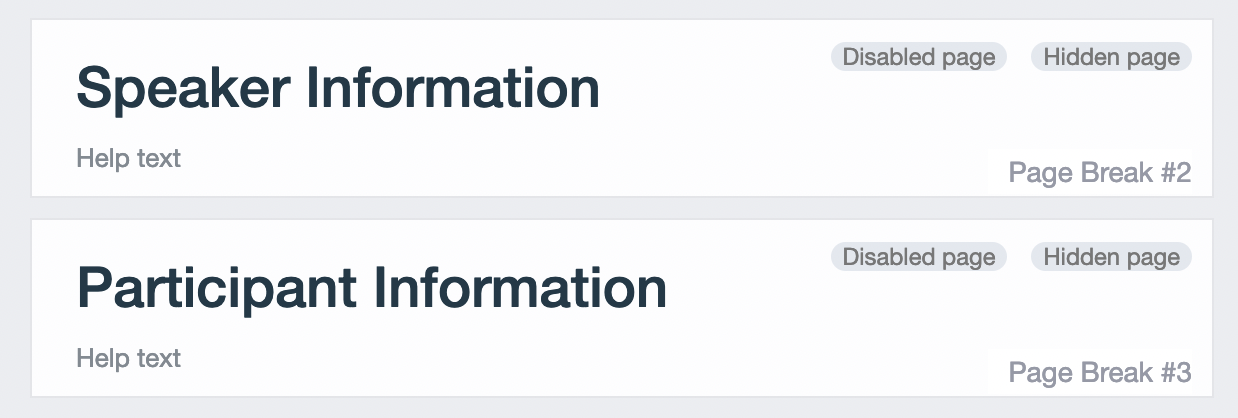
Add Break fields and set them to page break, so you can separate pages for each role-specific set of questions, such as “Speaker Information” and “Participant Details”.
-
Apply the following logic to the fields:
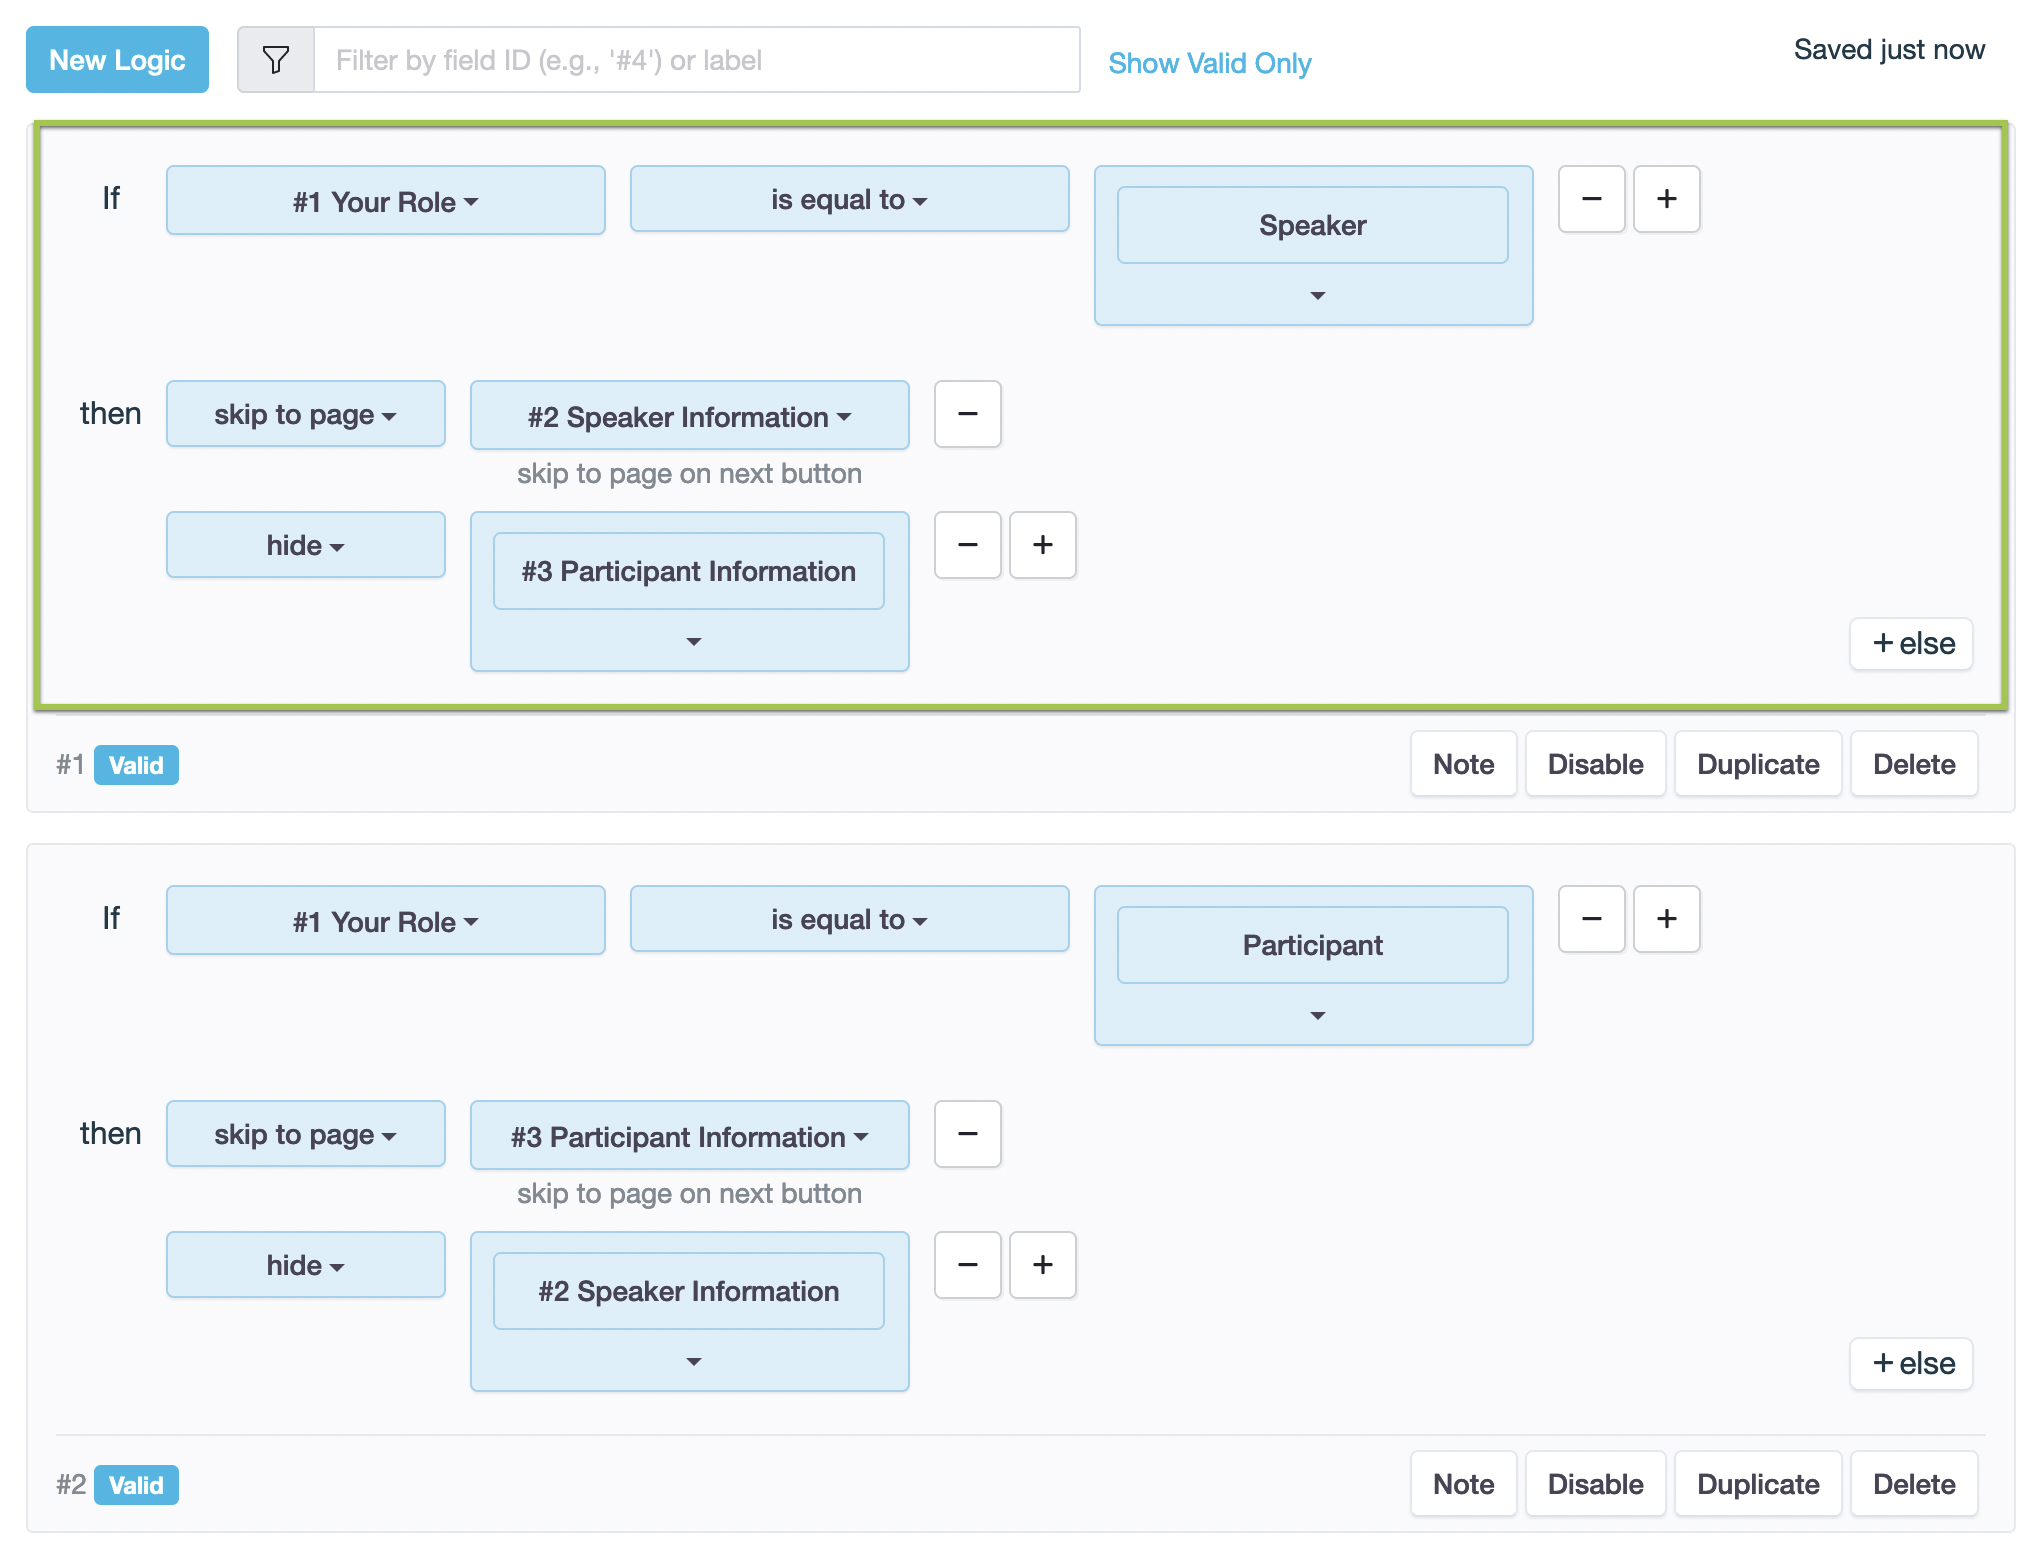
- Set condition: If #1 Your Role
is equal toSpeaker. - Set action: then
skip to page#2 Speaker Information,hide#2 Participant Information.
- Set condition: If #1 Your Role
-
Click on Duplicate to copy the logic and then adjust it for the skip page logic for “Participant”.
Preview
When the user selects “Speaker” in the “My Role” field, the form automatically skips to Page 2 (Speaker Information) to gather relevant details. Similarly, if the user selects “Participant”, the form skips to Page 3 (Participant Information). This way, users only see and complete the pages relevant to their role, creating a more efficient and personalized form experience.
Show different questions
| Description | Scenario |
|---|---|
| Ensures that questions asked later are relevant to earlier responses. | Imagine you’re creating an event registration form. If participants express interest in workshops (answering “yes”), the form will inquire about their reasons. If not (answering “no”), the form will skip ahead to ask why they’re not interested. |
Here’s how you can set it up:
-
Add the fields:
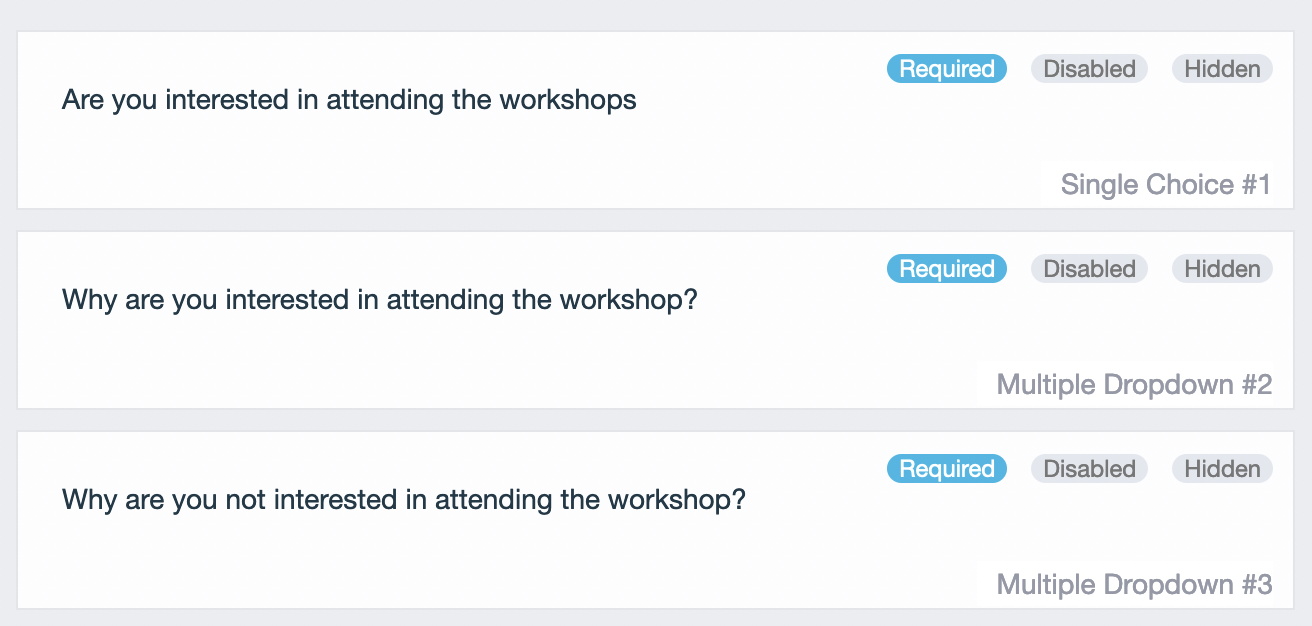
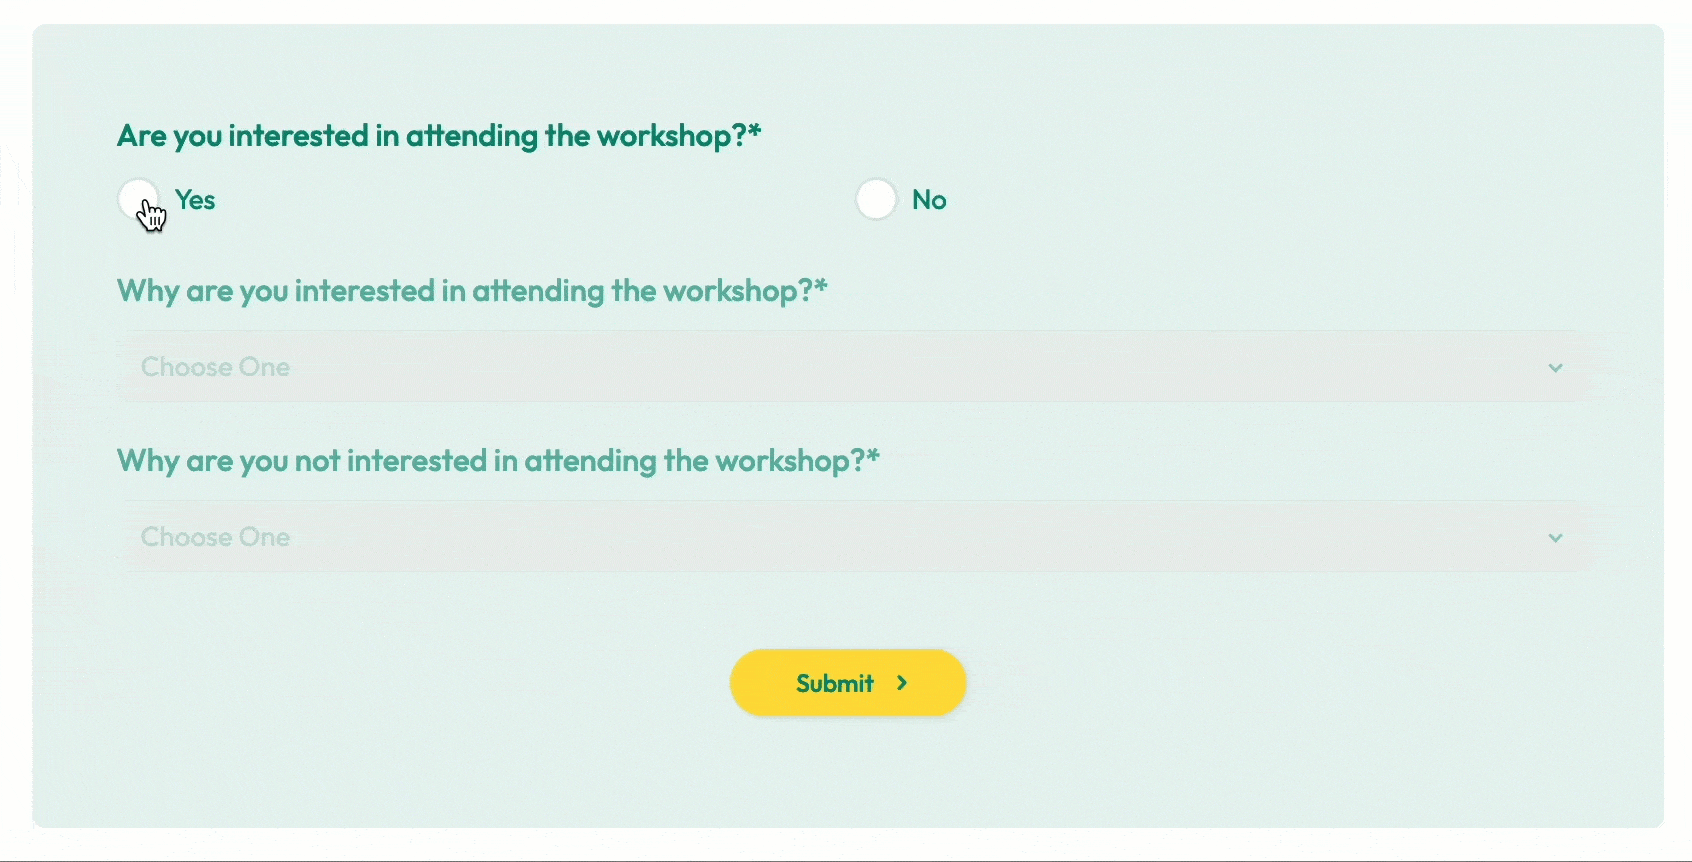
- Add a Choice Field (#1 Are you interested in attending the workshop?) and set it as a single-choice field with options such as “Yes” and “No”.
- Add a Dropdown Field (#2 Why are you interested in attending the workshop?).
- Add a Dropdown Field (#3 Why are you not interested in attending the workshop?).
NoteYou can configure the Dropdown fields to allow for multiple options.
-
Apply the following logic to the fields:
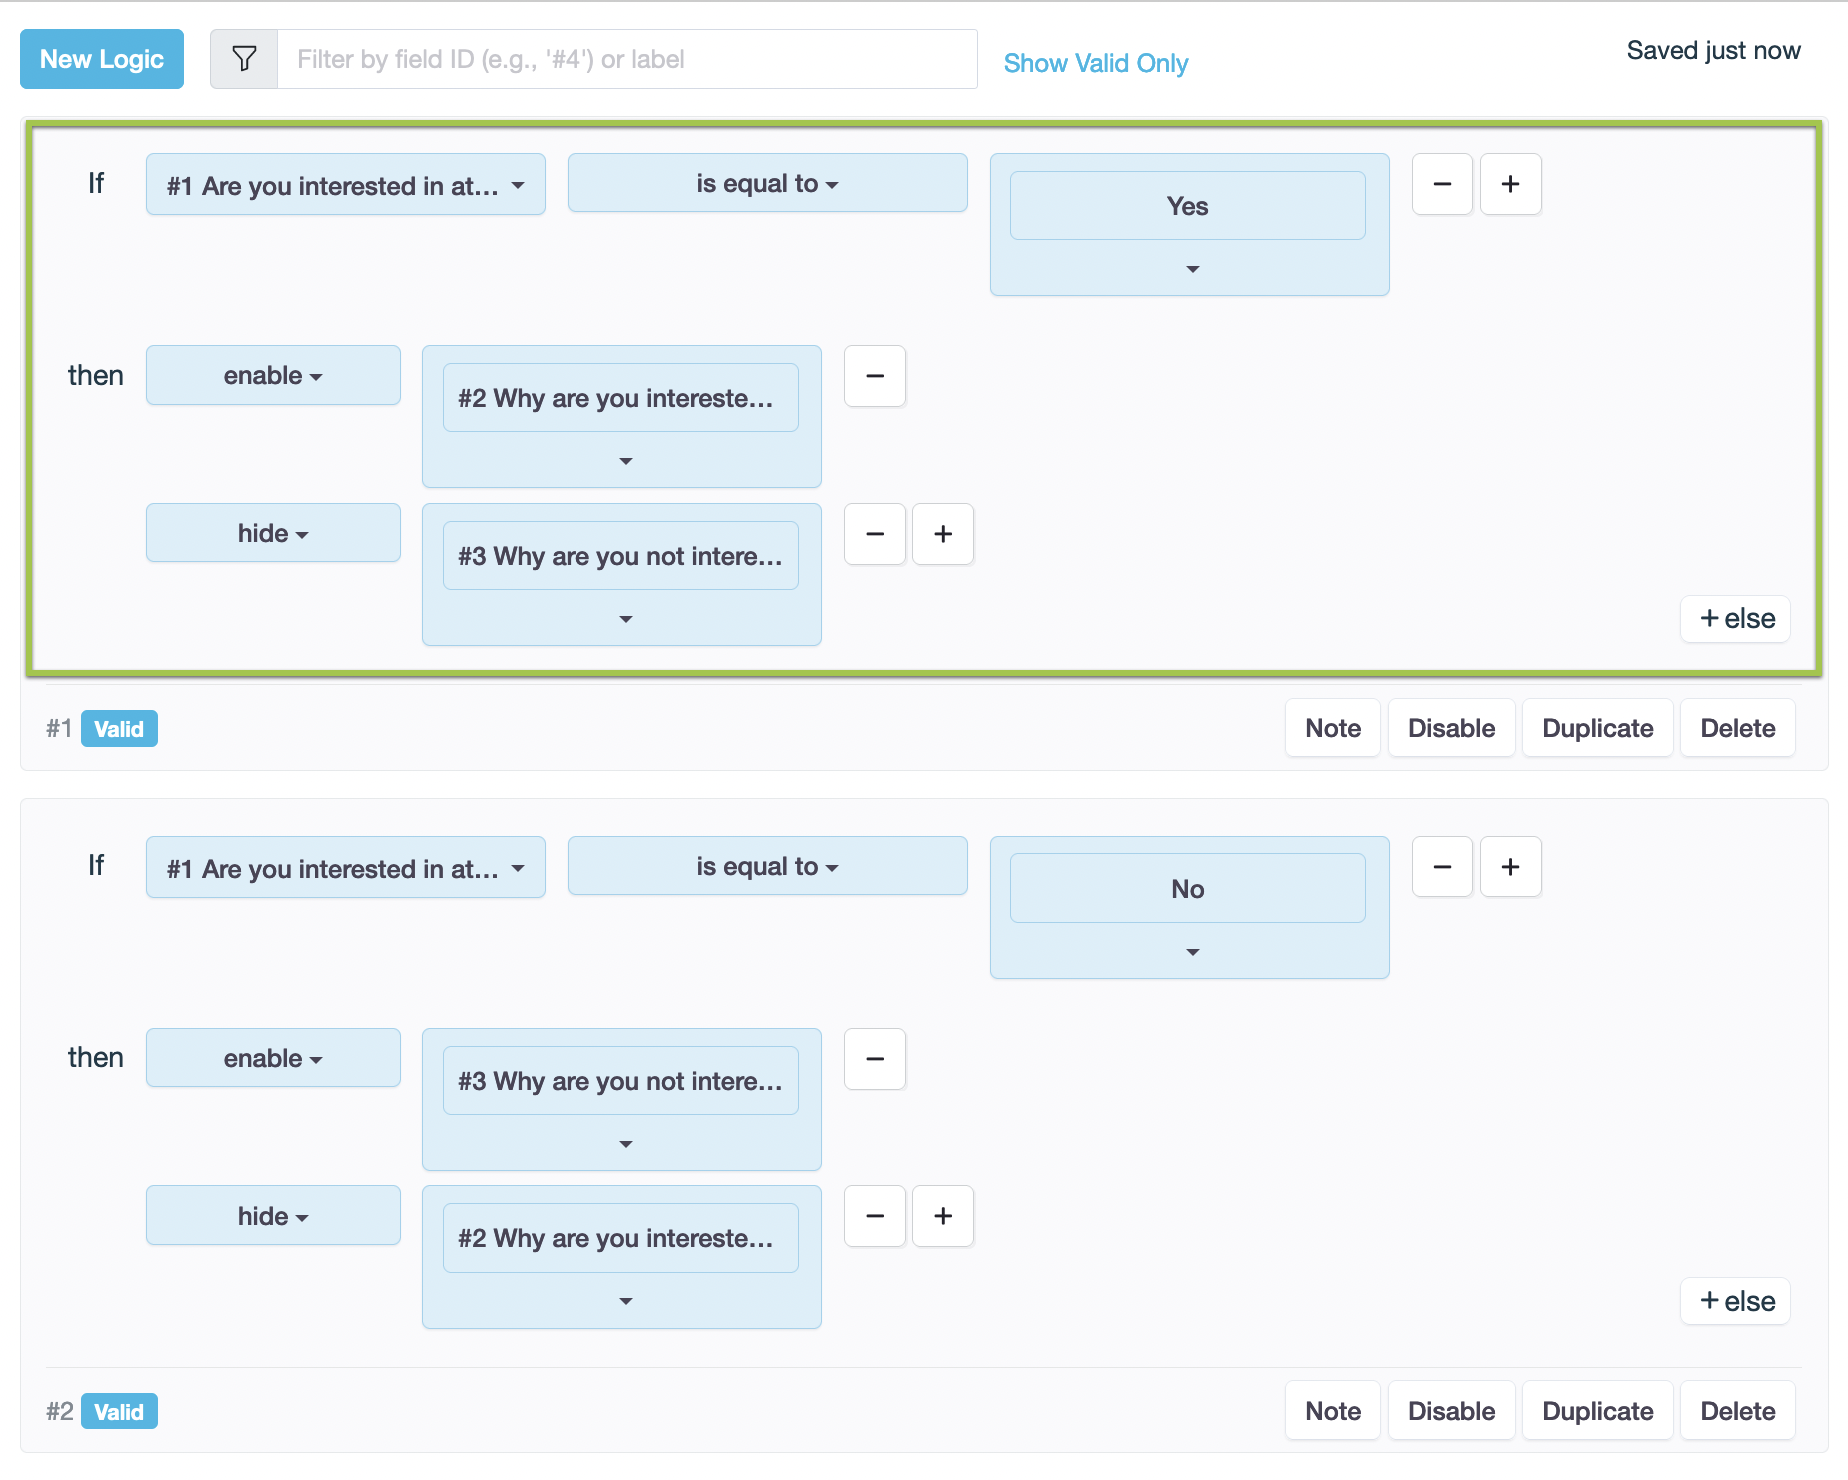
- Set condition: If #1
is equal toYes. - Set action: then
enable# 2,hide# 3.
- Set condition: If #1
-
Click on Duplicate to copy the logic and then adjust it for the branch question logic for “No”.
Preview
When the user selects “Yes”, the form enables #2 and hides #3.
When the user selects “No”, the form enables #3 and hides #2.
This logic tailors the form to user responses, making it more engaging and efficient.
Set and manage field values
Use logic to automatically handle data in your form. Available actions:
| Action | Description |
|---|---|
| Set value | Assign values automatically |
| Clear value | Remove values based on conditions |
| Copy value | Copy values from another field |
| Calculate | Perform calculations |
Set values
| Description | Scenario |
|---|---|
| Allows you assign values to form fields based on conditions or calculations. It automatically fills fields without needing user input. | Imagine you’re designing a registration form for an event with an early-bird discount. You can use “set value” logic to automatically calculate and assign the discounted fee based on the registration date. If the date is before 10/01/2023, the fee is $100; otherwise, it’s $120. |
Here’s how you can set it up:
-
Add the fields:
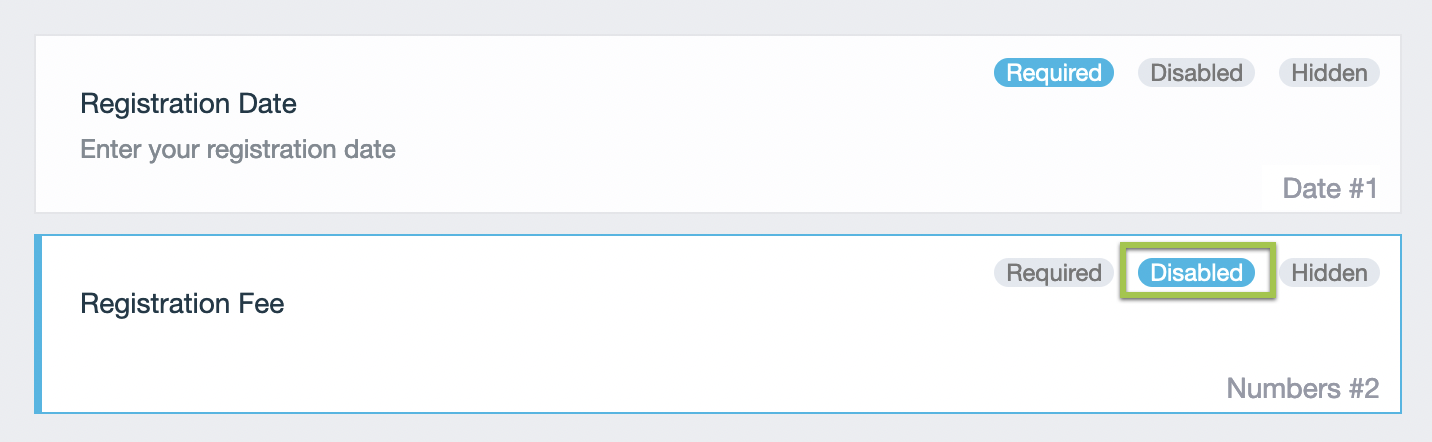
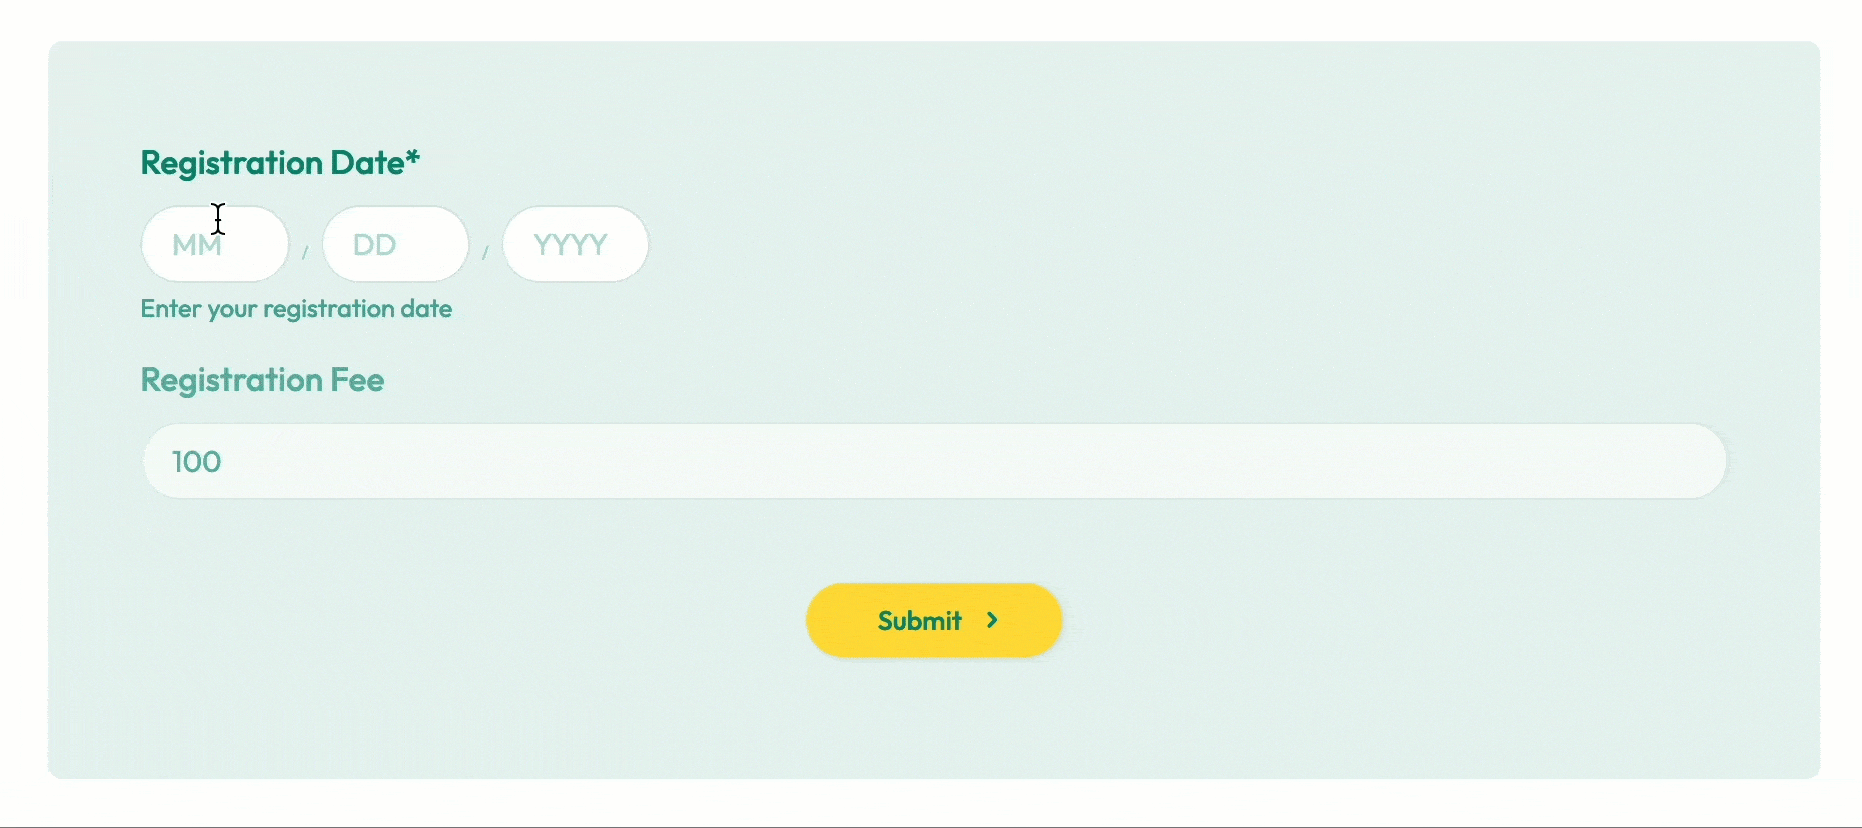
- Add a Text Field (#1 Registration Date) and set the text type as Date.
- Add a Text Field (#2 Registration Fee) and set the text type as Number.
NoteMake sure to set #2 Registration Fee to Disable to prevent users from editing the price.
-
Apply the following logic to the fields:

- Set condition: If #1
<= less than and equal to10/01/2023. - Set action:
- then
set value#2 to 100. - else
set value#2 to 120.
- then
- Set condition: If #1
Preview
When user selects a “Registration Date” before the early-bird deadline (10/01/2023), the set value logic will automatically determine and assign the “Registration Fee” to the early-bird fee ($100); Otherwise, assign value of “Registration Fee” to the regular fee ($120).
Clear values
| Description | Scenario |
|---|---|
| Allows you to automatically erase the content in a field based on specific conditions. | In an online shopping form, if a customer enters a promo code, you can automatically clear any discount amounts to avoid applying two different discounts. |
Here’s how you can set it up:
-
Add the fields:

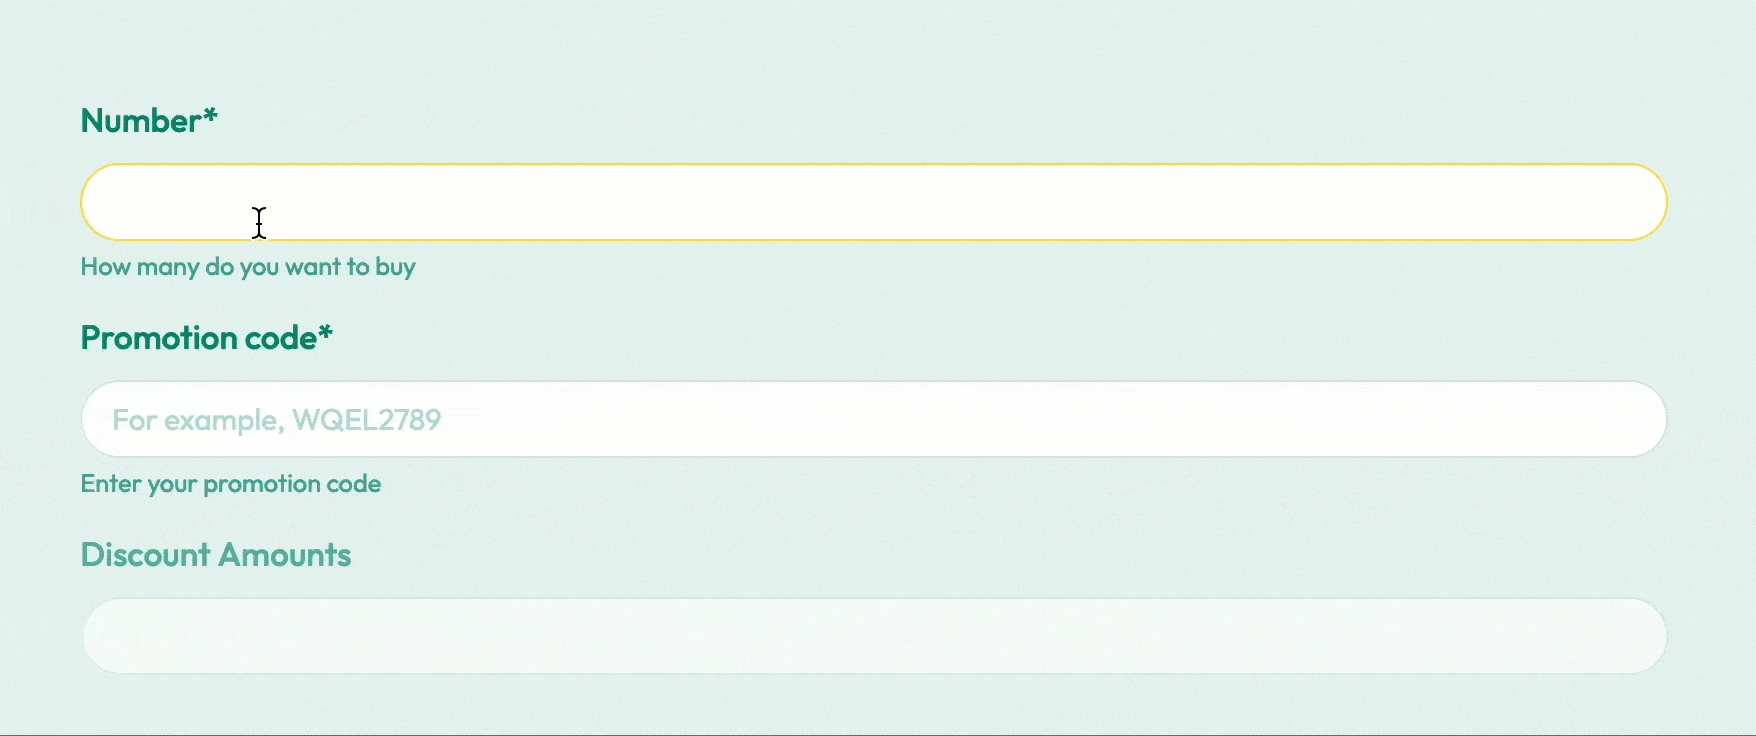
- A Number field (#1 Number) where customers can enter a purchase.
- A Number field (#3 Discount Amount) where it shows the discount amount (like 10% off if more than 10 pieces).
- A Text field (#2 Promotion Code) where customers can enter a promo code.
-
Apply the following logic to the fields:
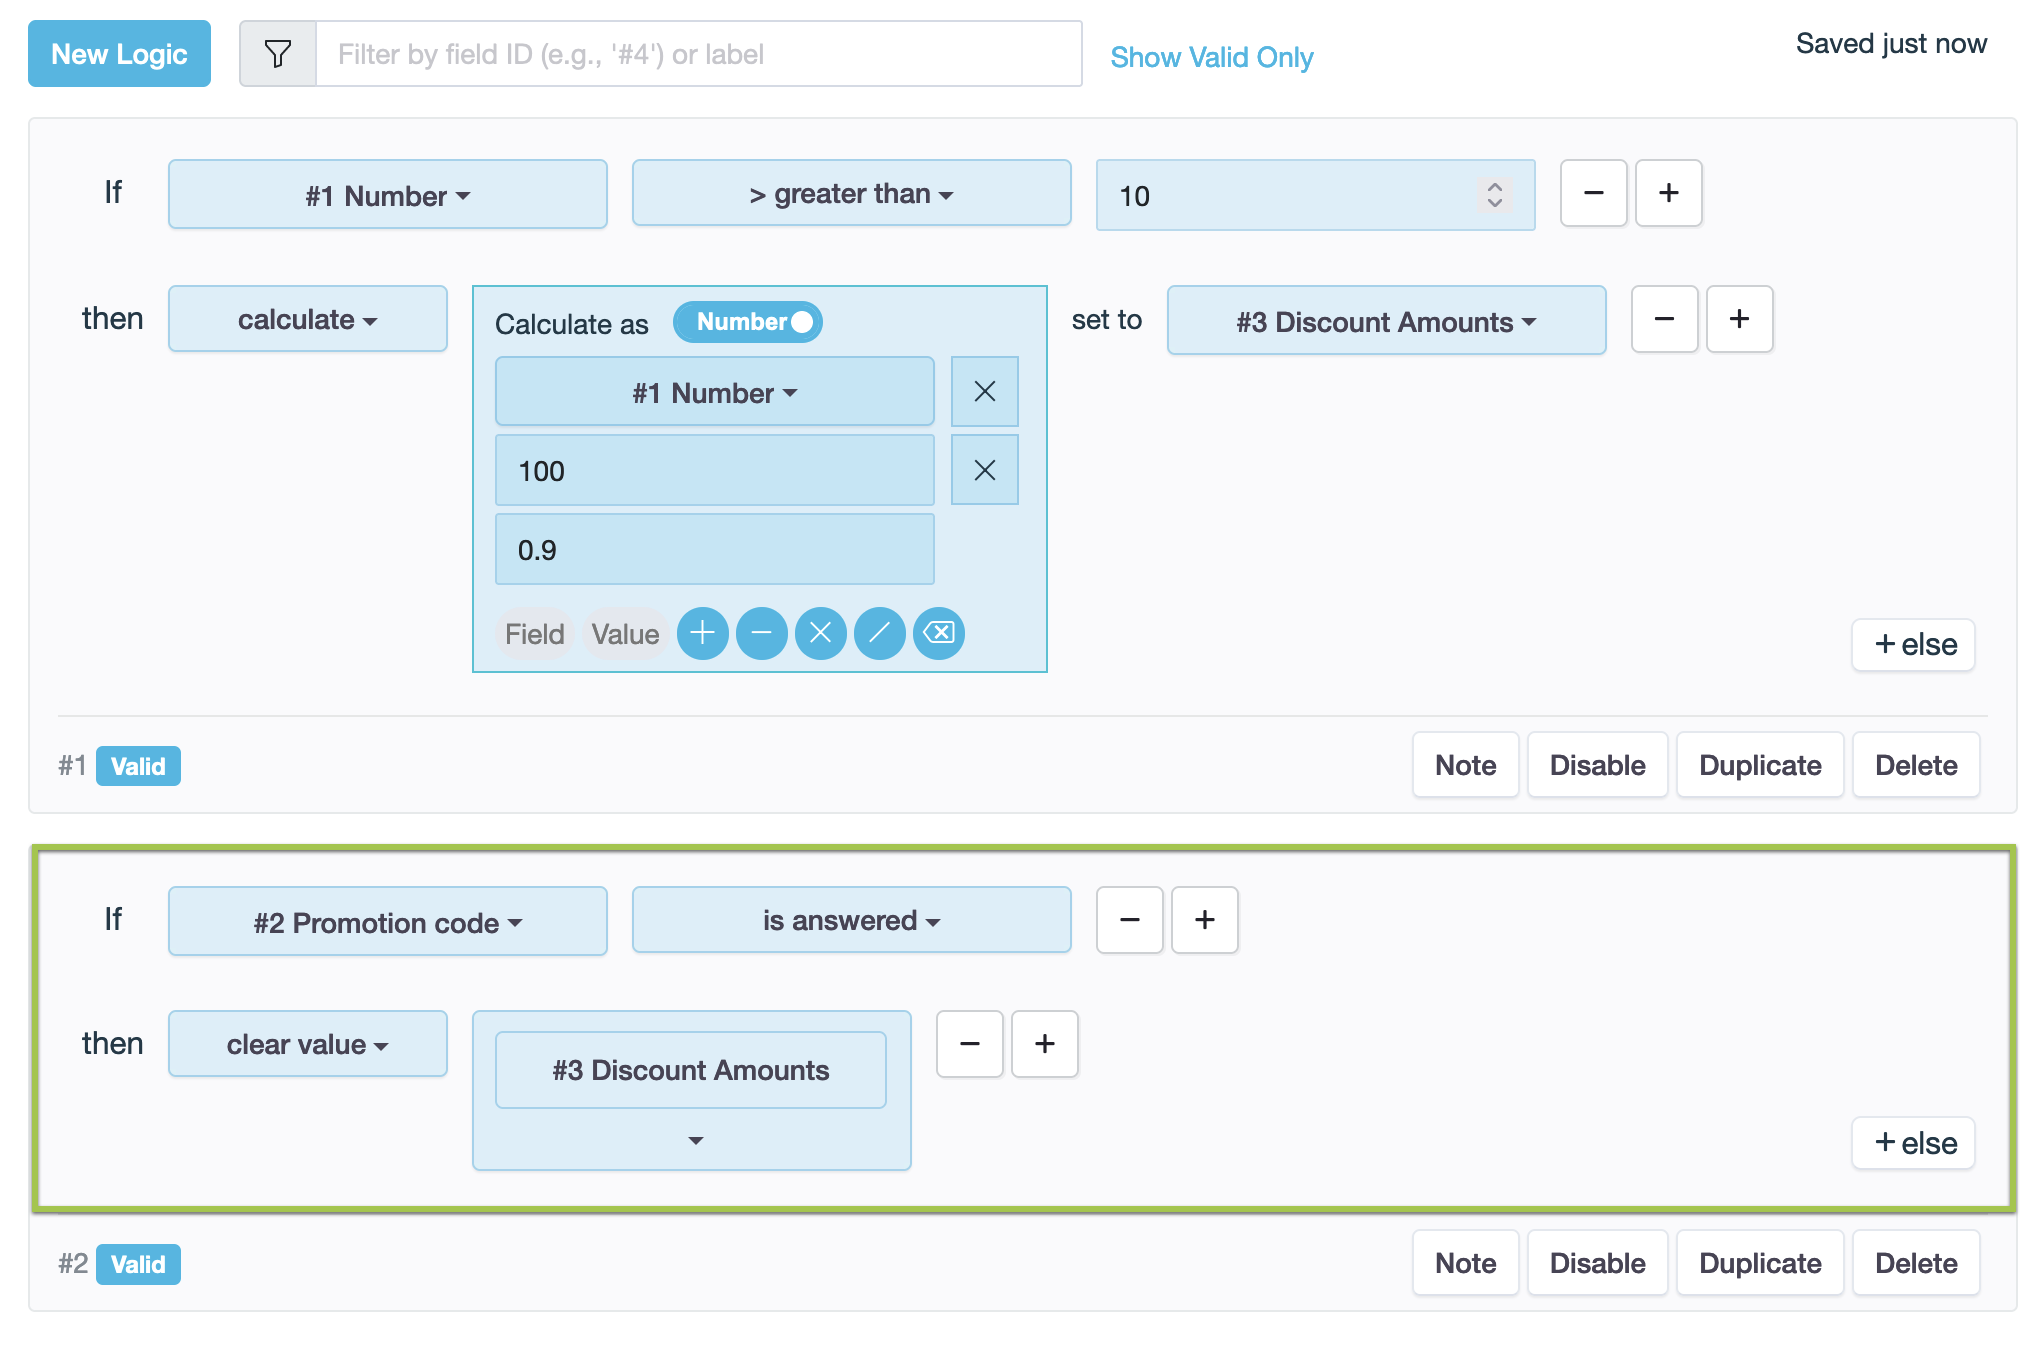
- Set condition: If #2
is answered. - Set action: then
clear value#3.
- Set condition: If #2
Preview
Discount Amounts field is automatically cleared when the user enters the Promotion Code.
Calculate values
| Description | Scenario |
|---|---|
| Empower forms to perform mathematical operations based on predefined rules. | Imagine you’re creating a bakery order form. Customers pick pastries and quantities. The form auto-calculates total cost from their choices. |
Here’s how you can set it up:
-
Create the fields:
- Add a Choice field (#1 Pastry Type) and set it as a single-choice field with options “Croissant ($2)”, “Muffin ($3)”, “Danish ($4)”.
- Add a Text Field (#2 Quantity) and set the text type as Number.
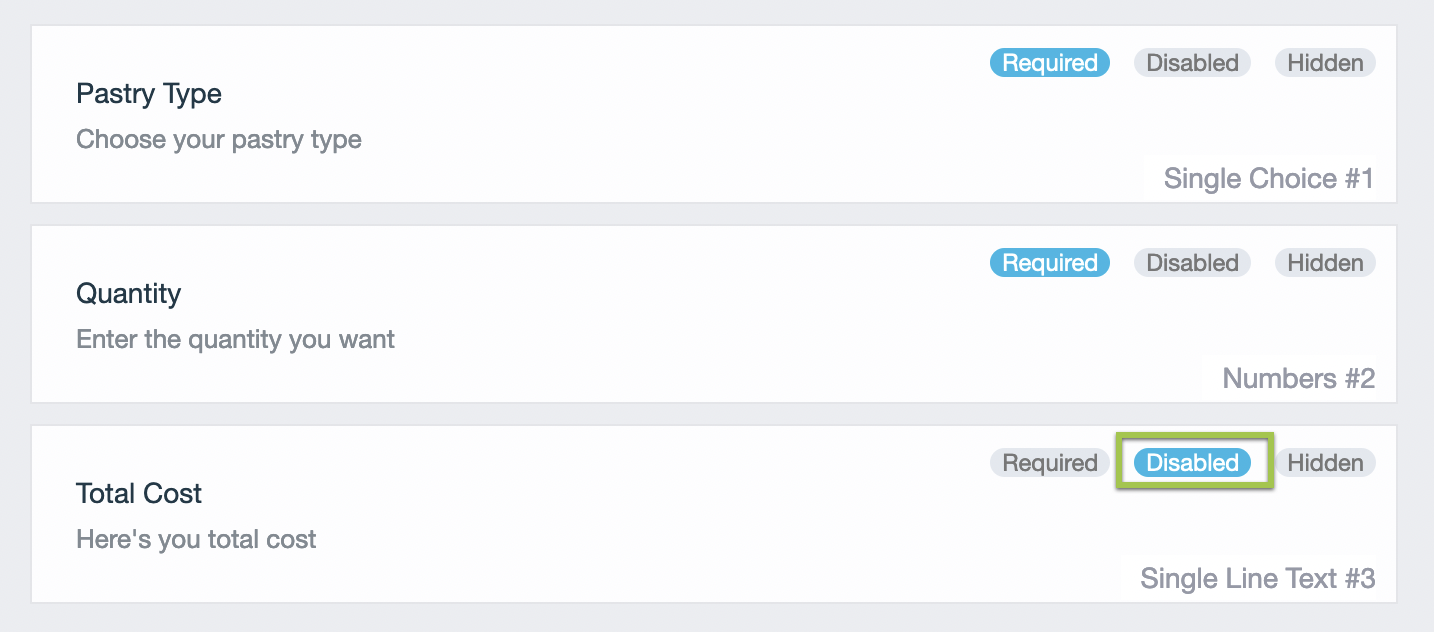
- Add a Text Field (#3 Total Cost) and set the text type as Number (this field will be calculated).
NoteMake sure to set #3 Total Cost to Disable so that users cannot edit the price.
-
Apply the following logic to the fields:
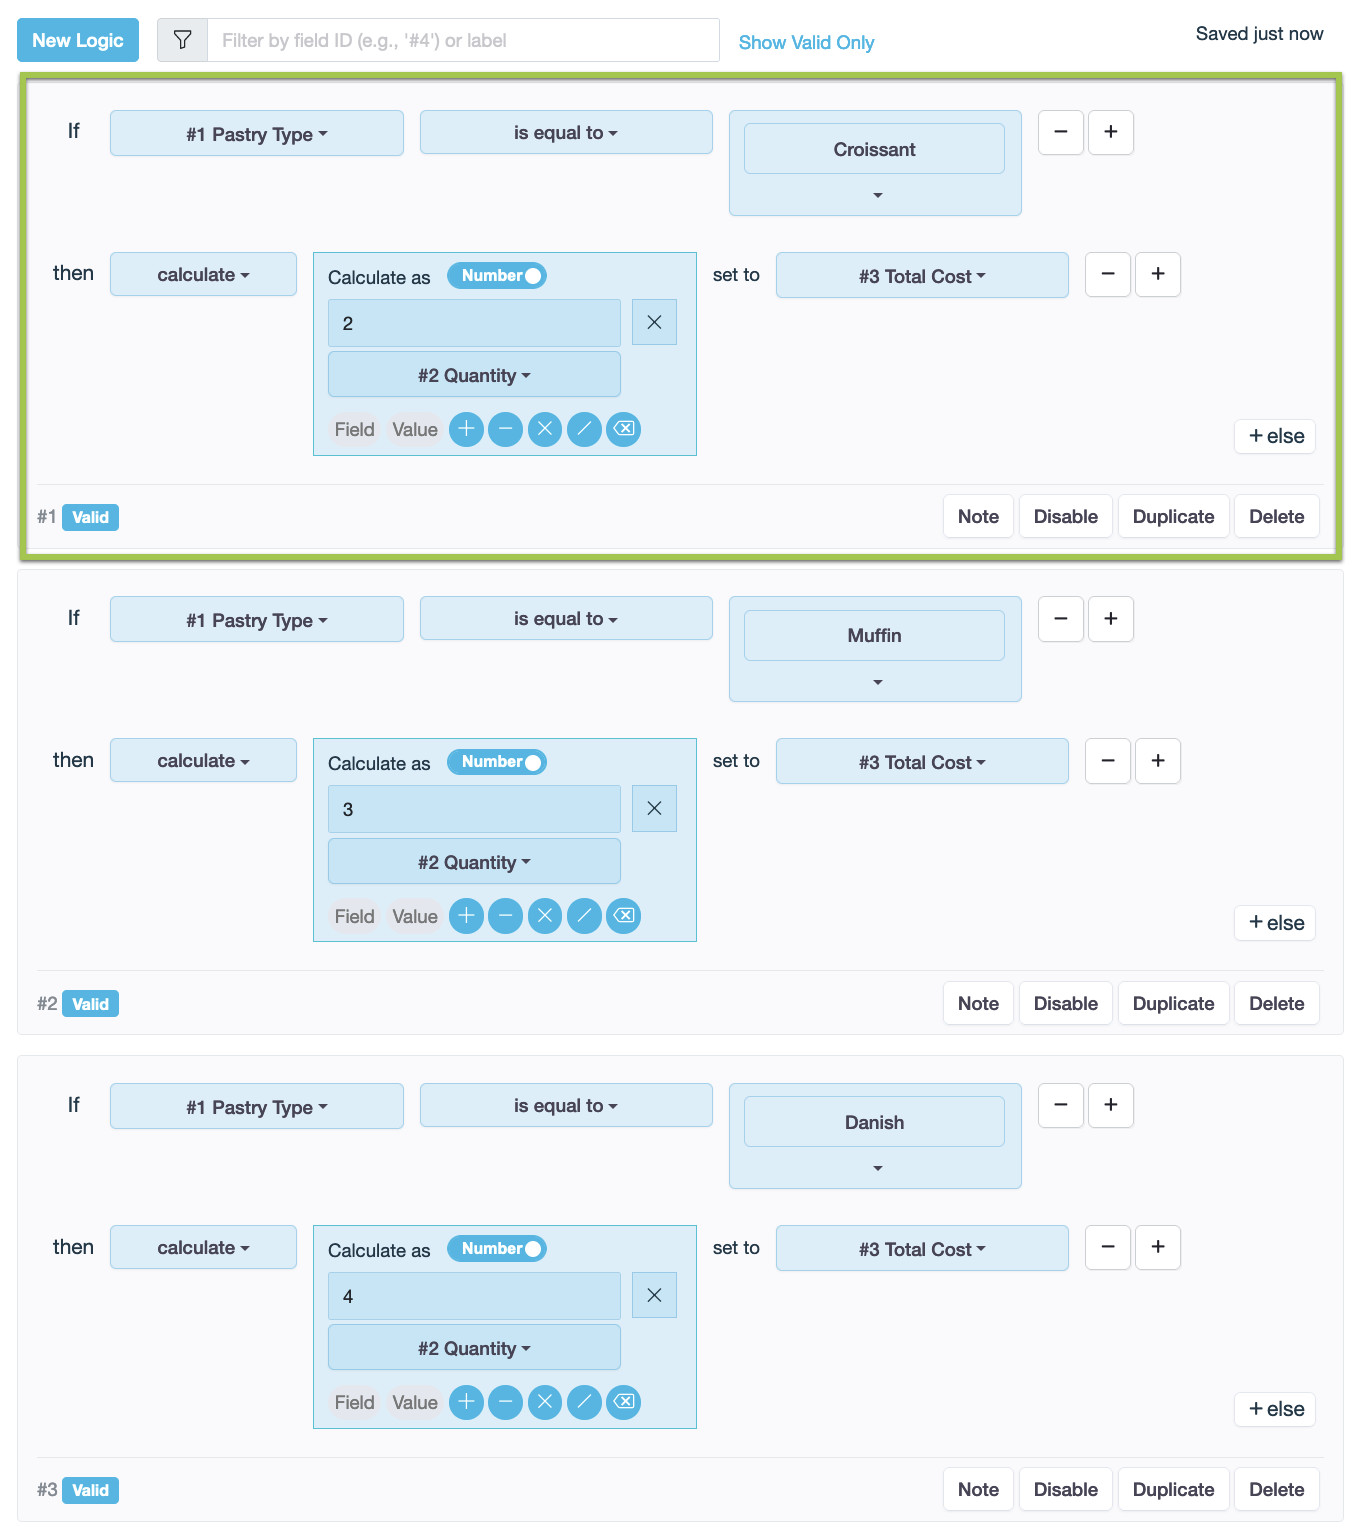
- Set condition: If #Pastry Type
is equal toCroissant. - Set action: then
calculate2 X #2 Quantityset to#3 Total Cost.
- Set condition: If #Pastry Type
-
Click on Duplicate to copy the logic and then adjust the parameters for the calculation of “Muffin” and “Danish”.
Preview
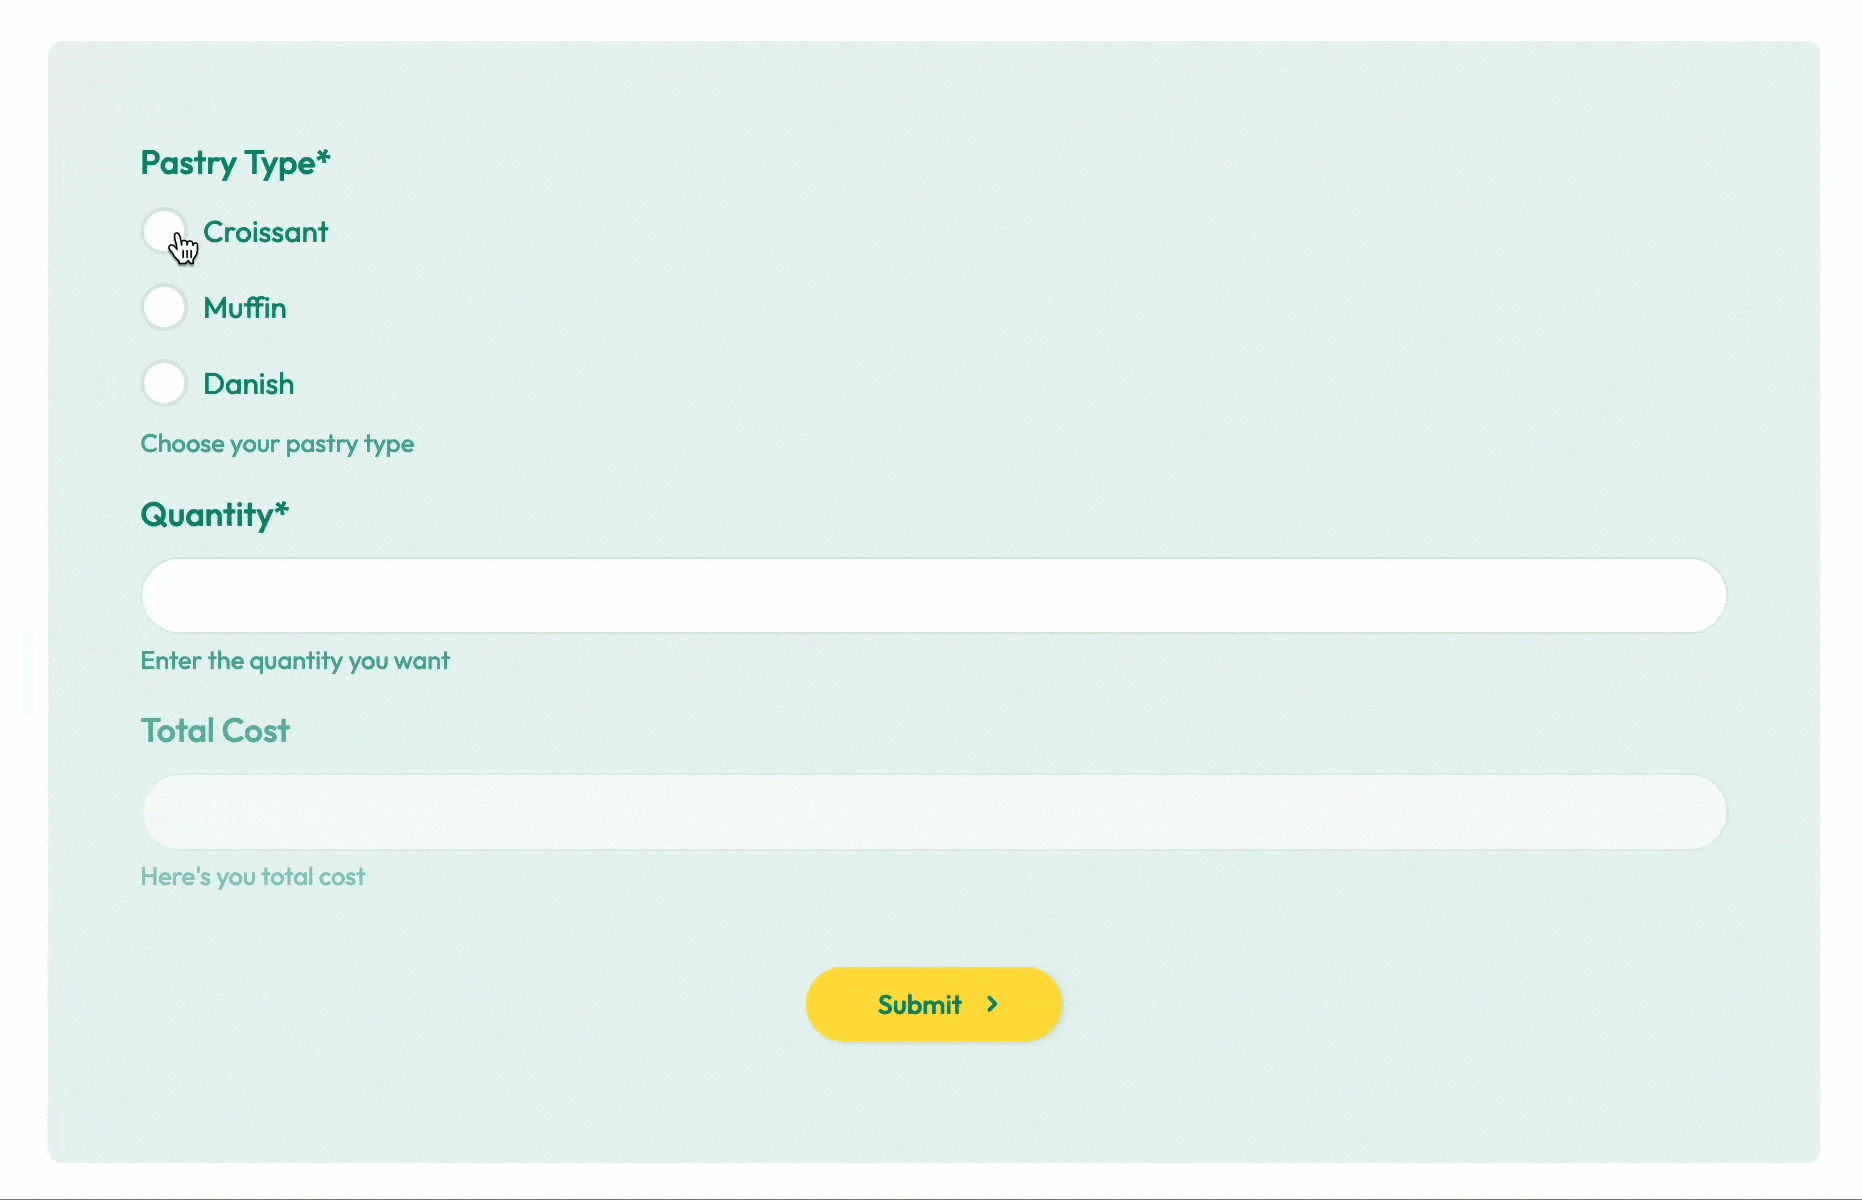
When a user selects the pastry type and enters the quantity, the “Total Cost” field will automatically display the calculated amount based on the chosen pastry and quantity.
Control PDF output
Show or hide fields in the PDF
Use logic to decide what appears in the generated PDF. Available actions:
| Action | Description |
|---|---|
| Print in PDF | Include a field in the generated PDF |
| Don’t print in PDF | Exclude a field from the generated PDF |
Here’s how you can set it up:
- Condition: e.g. If a field
is answered - Action:
- then
print in PDF - else
don't print in PDF
- then
Preview
The field will only appear in the generated PDF when the condition is met.
Use AI to create logic
You can also use Gen by AI to generate the logic described above.
Describe what you want in plain language, for example:
- “Show this field only when the user selects Yes”
- “Include this field in the PDF only when the answer is filled”
The system will generate the corresponding logic for you automatically.