Create an invitation
Tabs
Once you’ve published a form, you can invite your users to fill it out.
Choose the invitation method
You can create invitations through either the Dashboard or the Workflows page. Select the method that suits your needs:
-
Dashboard: Quick and simple invitations, ideal for individuals or one-time events.
-
Workflows: Incorporate invitations into established workflows, suitable for complex or organized processes. Ensure that form invitations are automatically triggered as part of a step-by-step series of actions.
Option 1: Create an invitation from Dashboard
To create invitations on a case-by-case basis, follow these steps:
-
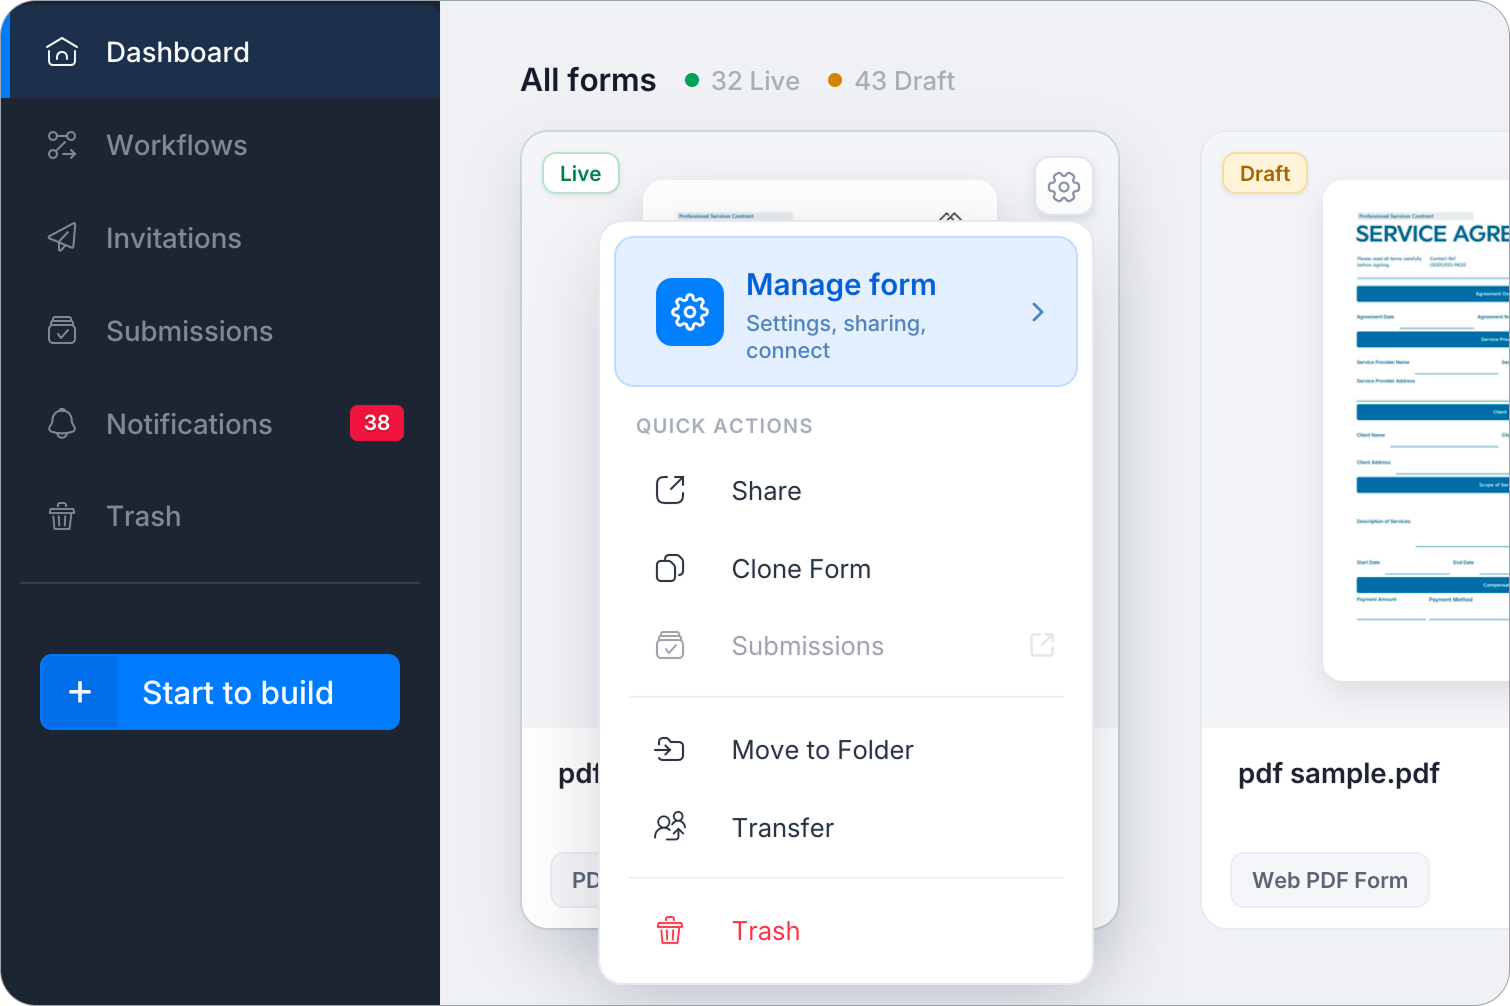
On the Dashboard, hover over the desired form, click the Settings (gear icon) at the top right, then click Manage Form.
-
In the left-hand navigation, under Share & access, click Invitations.
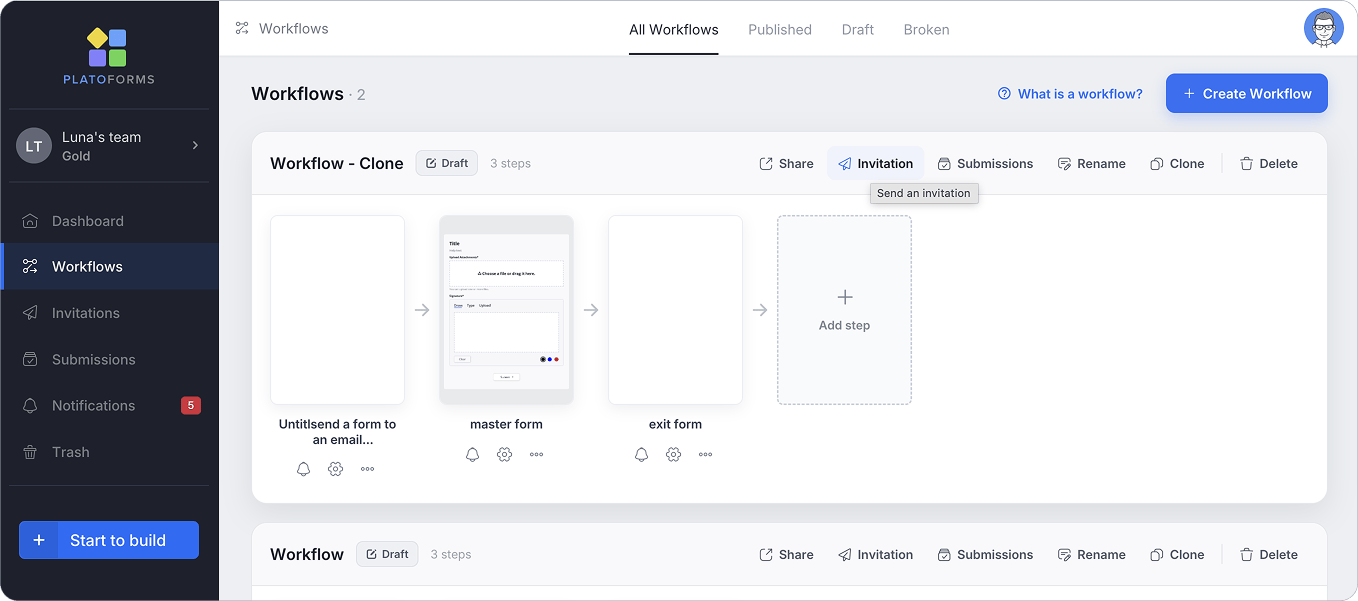
Option 2: Create an invitation from Workflows
To trigger form invitations as part of a larger workflow that involves multiple steps and participant, follow these steps:
-
In the left navigation, click Workflows.
-
Find the workflow you want, then click Invitation in its action bar.
Set up invitation
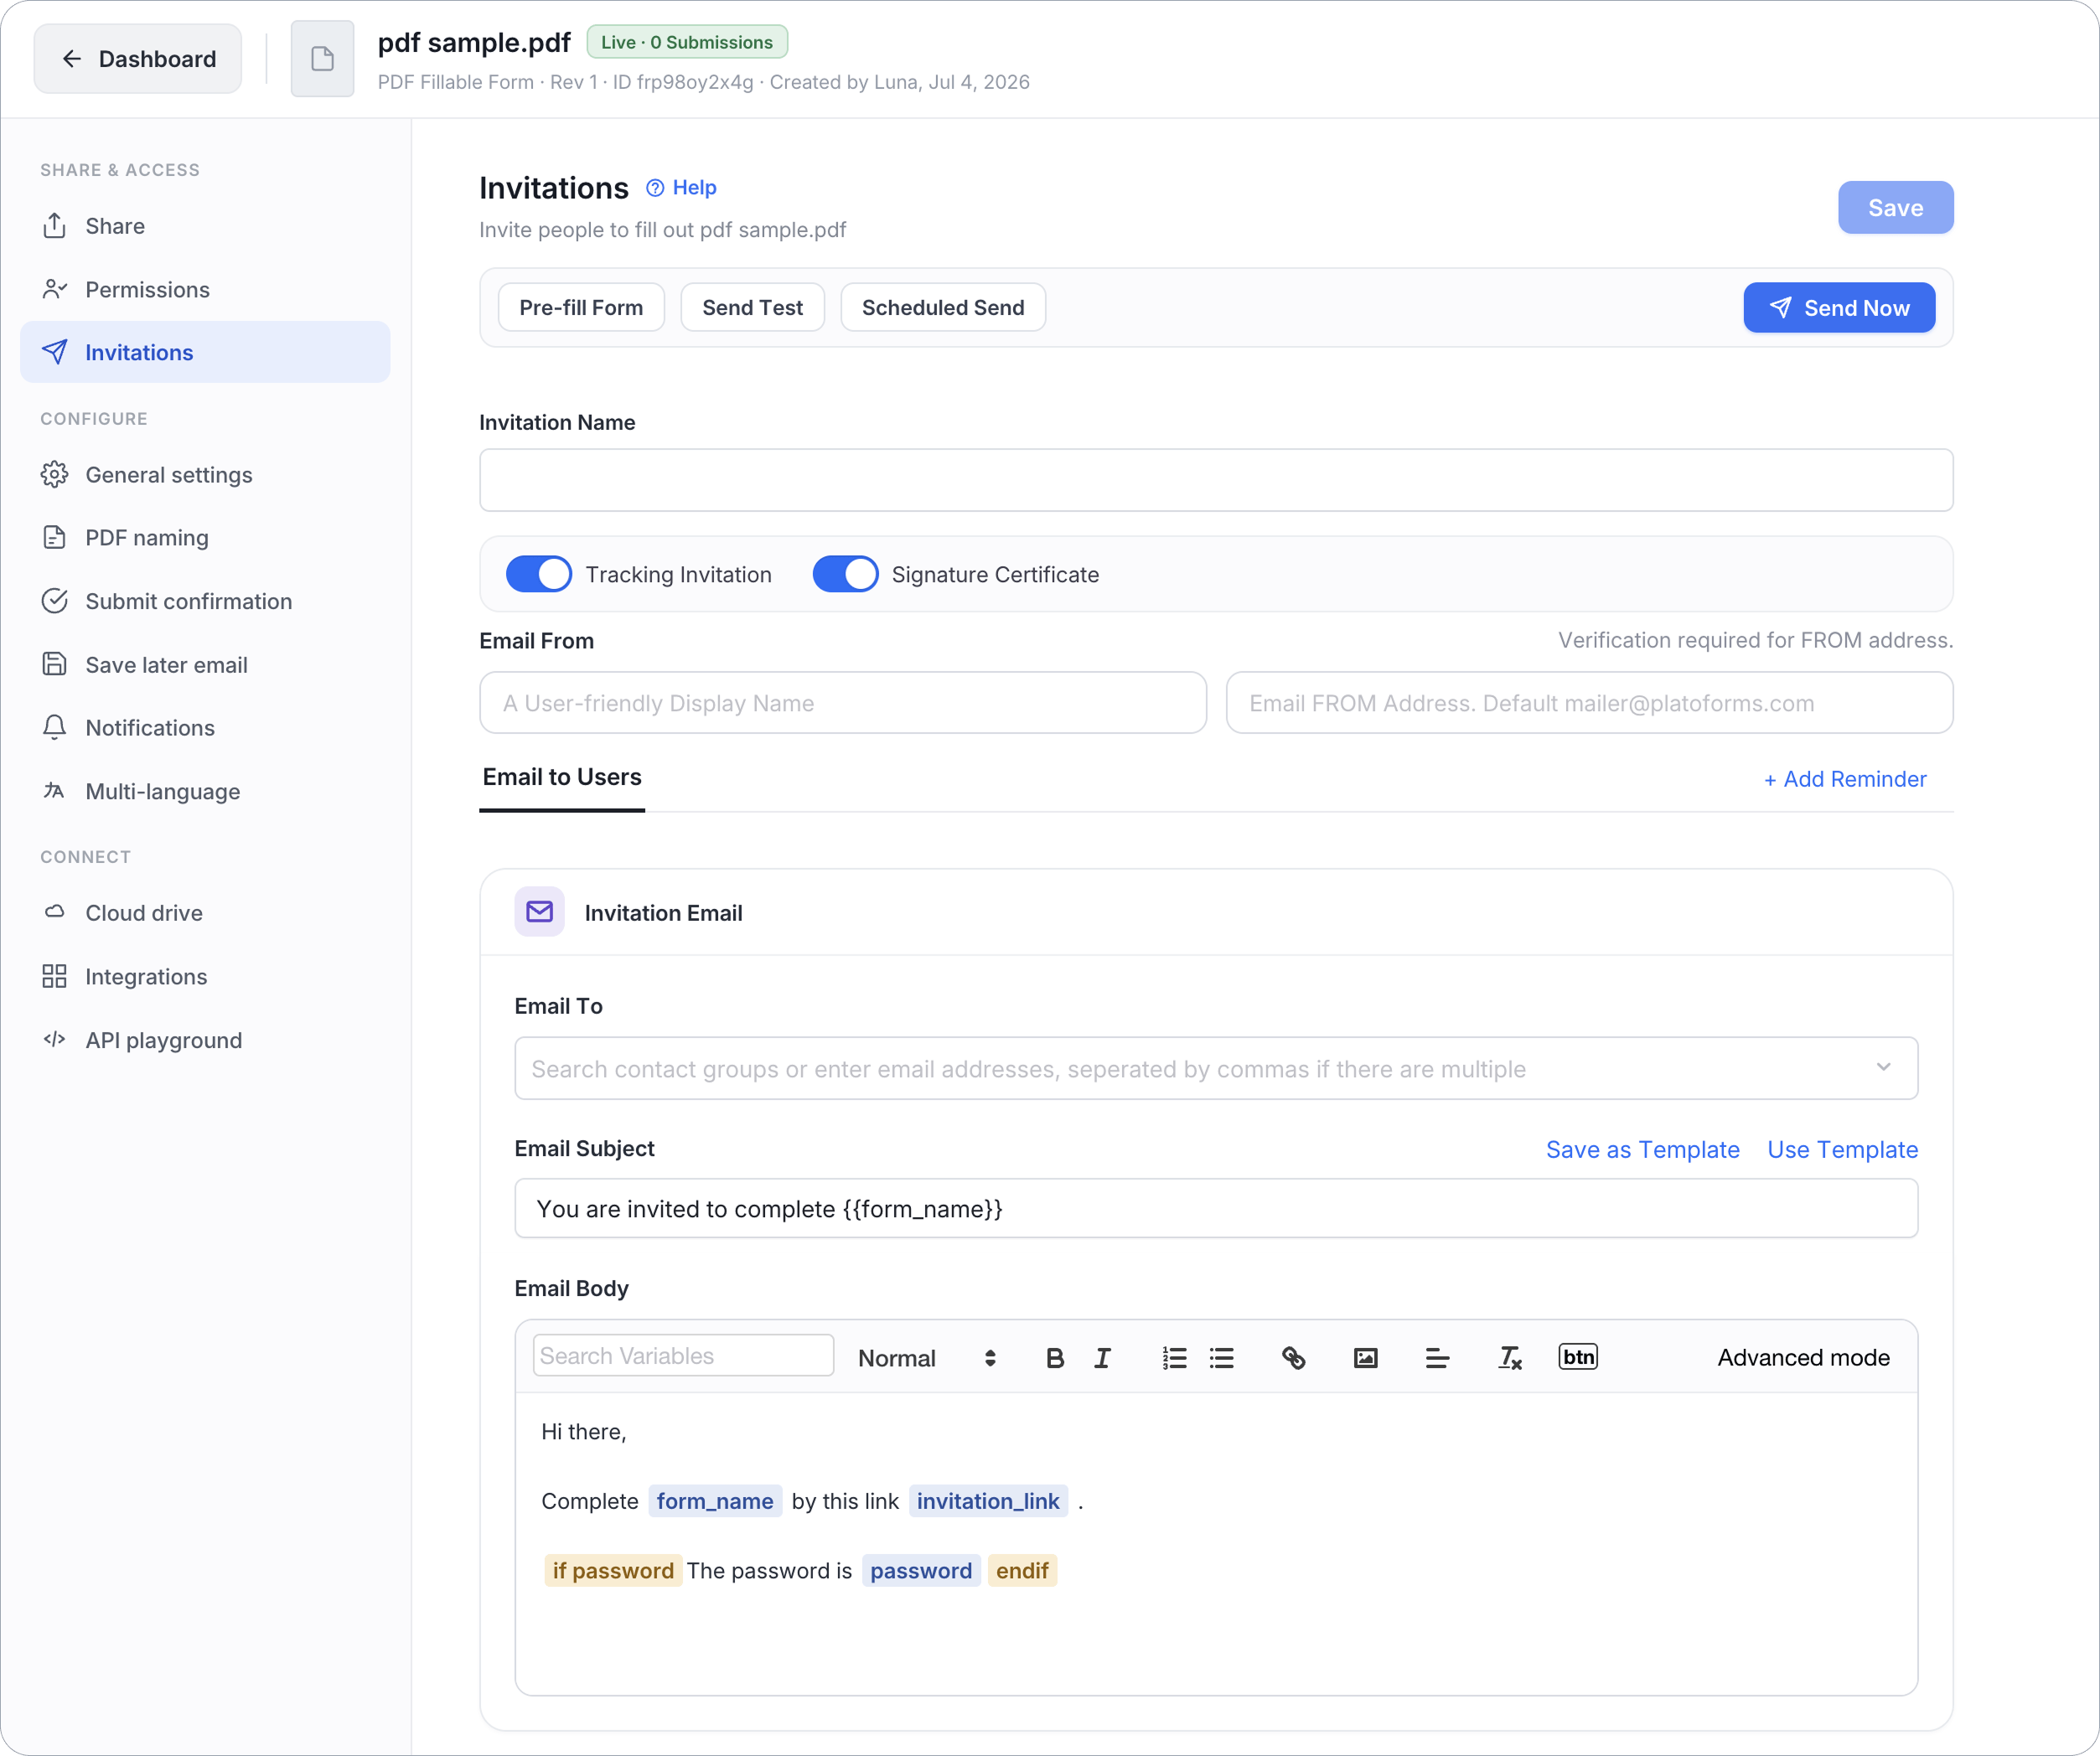
On the Invitations page, set your preferences. For more details, refer to the sections below.
At the top of the page, you’ll find three action buttons:
- Pre-fill Form: Pre-populate form fields with data before sending the invitation.
- Send Test: Send a test copy of the invitation to yourself before sending it to recipients.
- Scheduled Send: Schedule the invitation to be sent at a specific date and time.
Click Send Now in the top right to send the invitation immediately once configured.
Track invitations
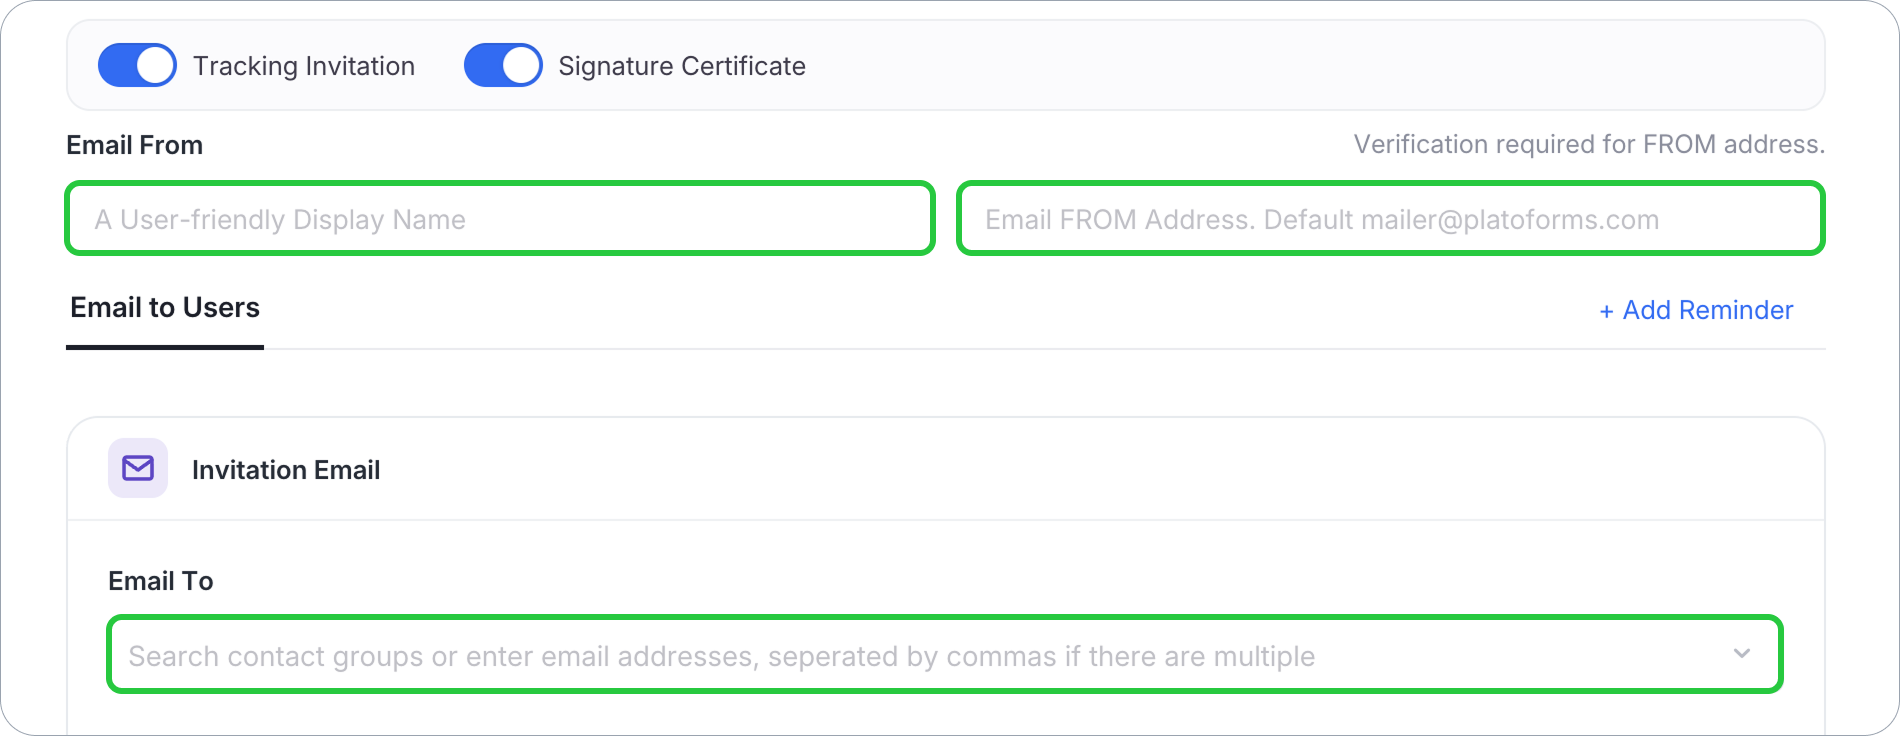
Enable or disable the Tracking Invitation option according to your needs.
![]()
-
When Tracking Invitation is disabled, sent invitations won’t be stored, offering limited control compared to the tracking-enabled mode.
-
With Tracking Invitation enabled, from the Invitations panel, you can:
When Tracking Invitation enabled Available settings Specify an Invitation Name for record keeping. 
Save the invitation edits. 
Enable Signature Certificate. 
Schedule a specific date and time for sending the invitation. 
Add password protection. 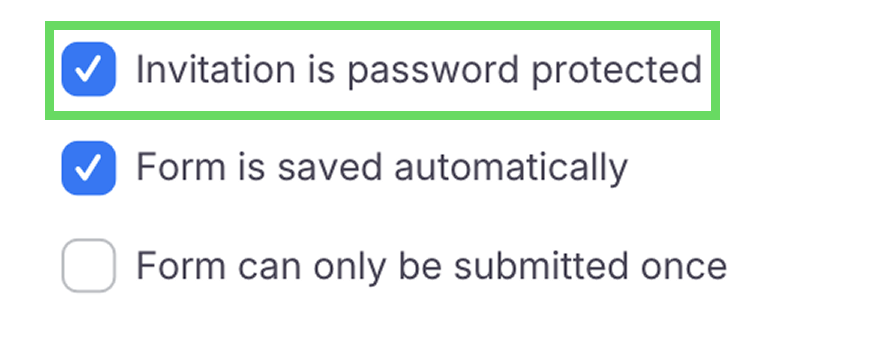
Save your user’s edits. 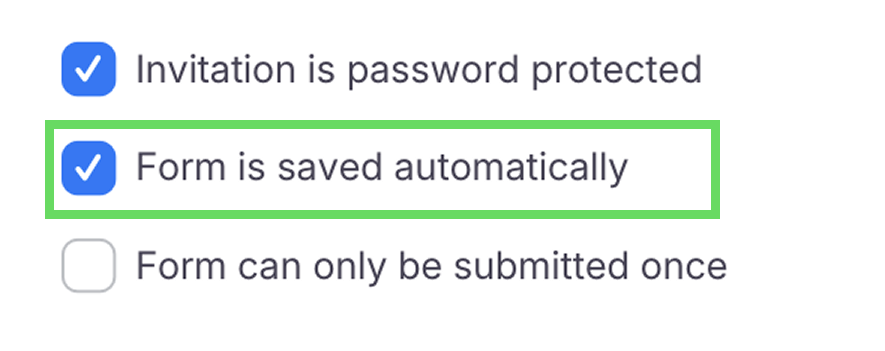
Choose whether the form can be filled multiple times. 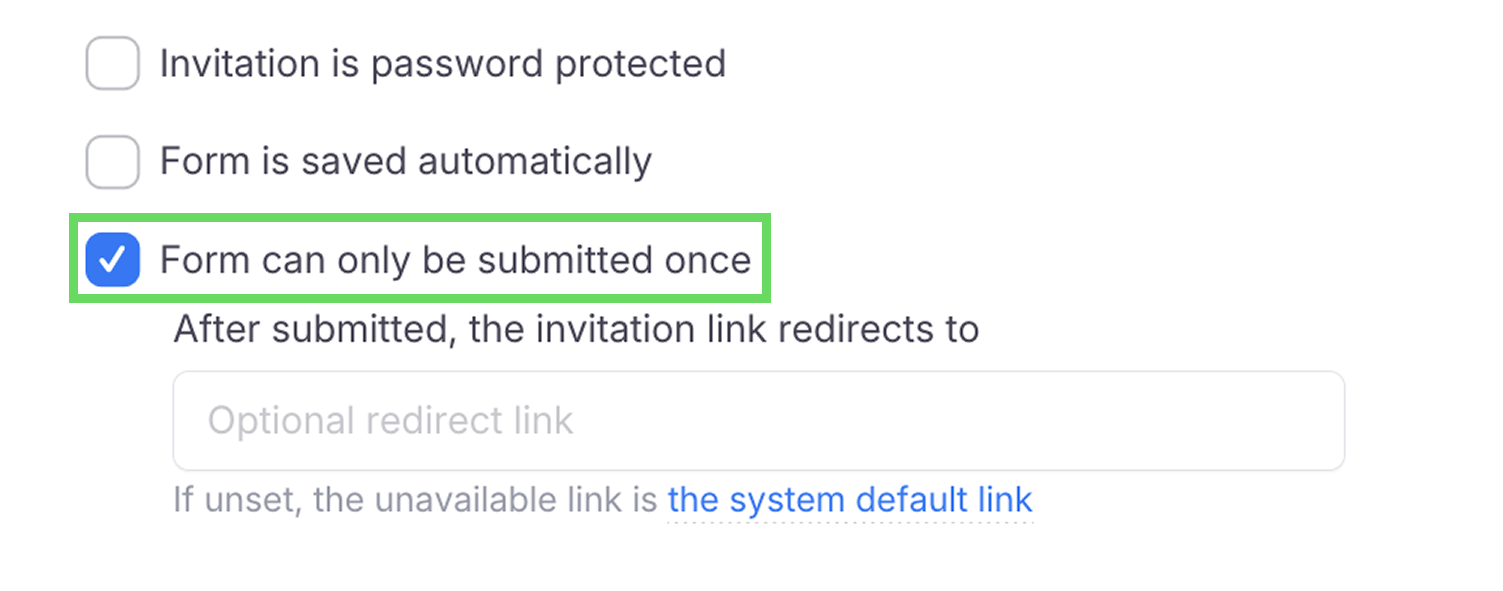
Configure email addresses
You can set up two types of e-mail addresses:
- Sending address (Email From).
- Receiving address (Email To).
-
Email From
This is the sender details, including the Display Name (sender name) and Email From Address (the email address to use as the sender). The default Display Name is “Mailer,” and the default Email From Address is “mailer@platoforms.com”.
To customize the sender details, verify one of the following:- Domain (Recommended): Verify your whole email domain so you can send from any address under it. See Send email with custom domain.
- This Email Only (Higher Bounces): Verify a single email address. Only that exact address can be used as the sender.
NoteVerifying a single email only authorizes that precise address — for example, if you verify
mailer@mydomain.com, only that address can be used for invitations.To verify a single email address:
-
Upgrade to a premium plans.
-
On the Invitations panel, enter your custom Display Name and Email From Address.
-
Click This Email Only.

A verification email will be sent to the email address you entered.
-
Check your email inbox for the verification message and follow the instructions in the verification email to complete the process.
Once verification is successful, you can use the customized sender details to send invitations.
-
Email To
Enter up to 5 email addresses, separated by commas. For sending to more recipients, please upload contacts on the Invitations page in advance.
Add a reminder
Next to Email to Users, click + Add Reminder to automatically remind recipients who haven’t completed the form. See Set up reminders for details on how reminders work and how to configure them.
Customize email content
You can customize your email content by customizing the default title and message.
-
In the Email Subject field, edit your title with
{{form_name}}. See the example below: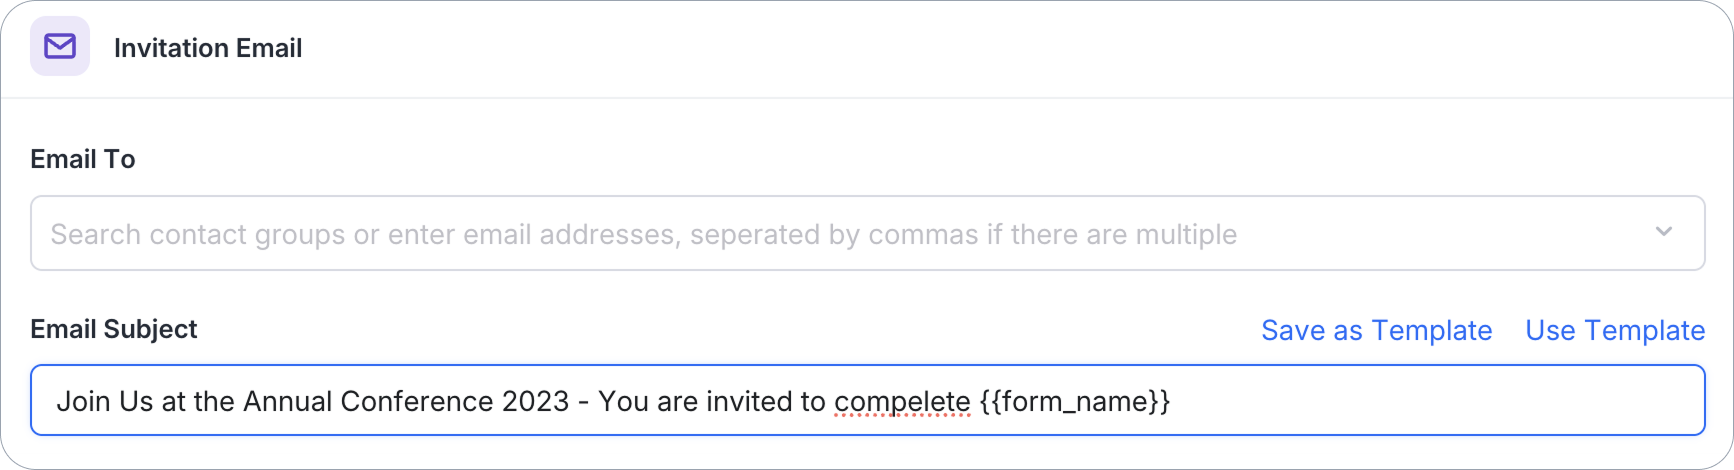
-
In the Email Body input box, write your email and select the desired variables from the Search Variables dropdown list. See the example below:
 Note
NoteFor more details, refer to the Variables in email body section below.
This is the recipient’s view:

Variables in email body
When creating your Email Body, you can select from a range of variables available in the Search Variables dropdown list.

first_name: Insert the first name of the contacts.last_name: Insert the last name of the contacts.invitation_link: Includes the invitation link in the email for recipients to access and submit the form.password: Include the automatically generated password for accessing the form. To utilize this variable, ensure you scroll down and enable the Invitation is password protected option.form_name: Show the name of the particular form you are sending to the recipient.password logic: A conditional statement that displays the password if the Invitation is password protected option is enabled.
Set invitation password
To create a password for your clients to access the form, follow these steps:
-
In the Invitations panel, enable the Tracking Invitation option.

-
Scroll down and check the Invitation is password protected option.
After you’ve sent the invitation to your client, they’ll get an invitation email with the password.

They’ll need to use the password to access the form.

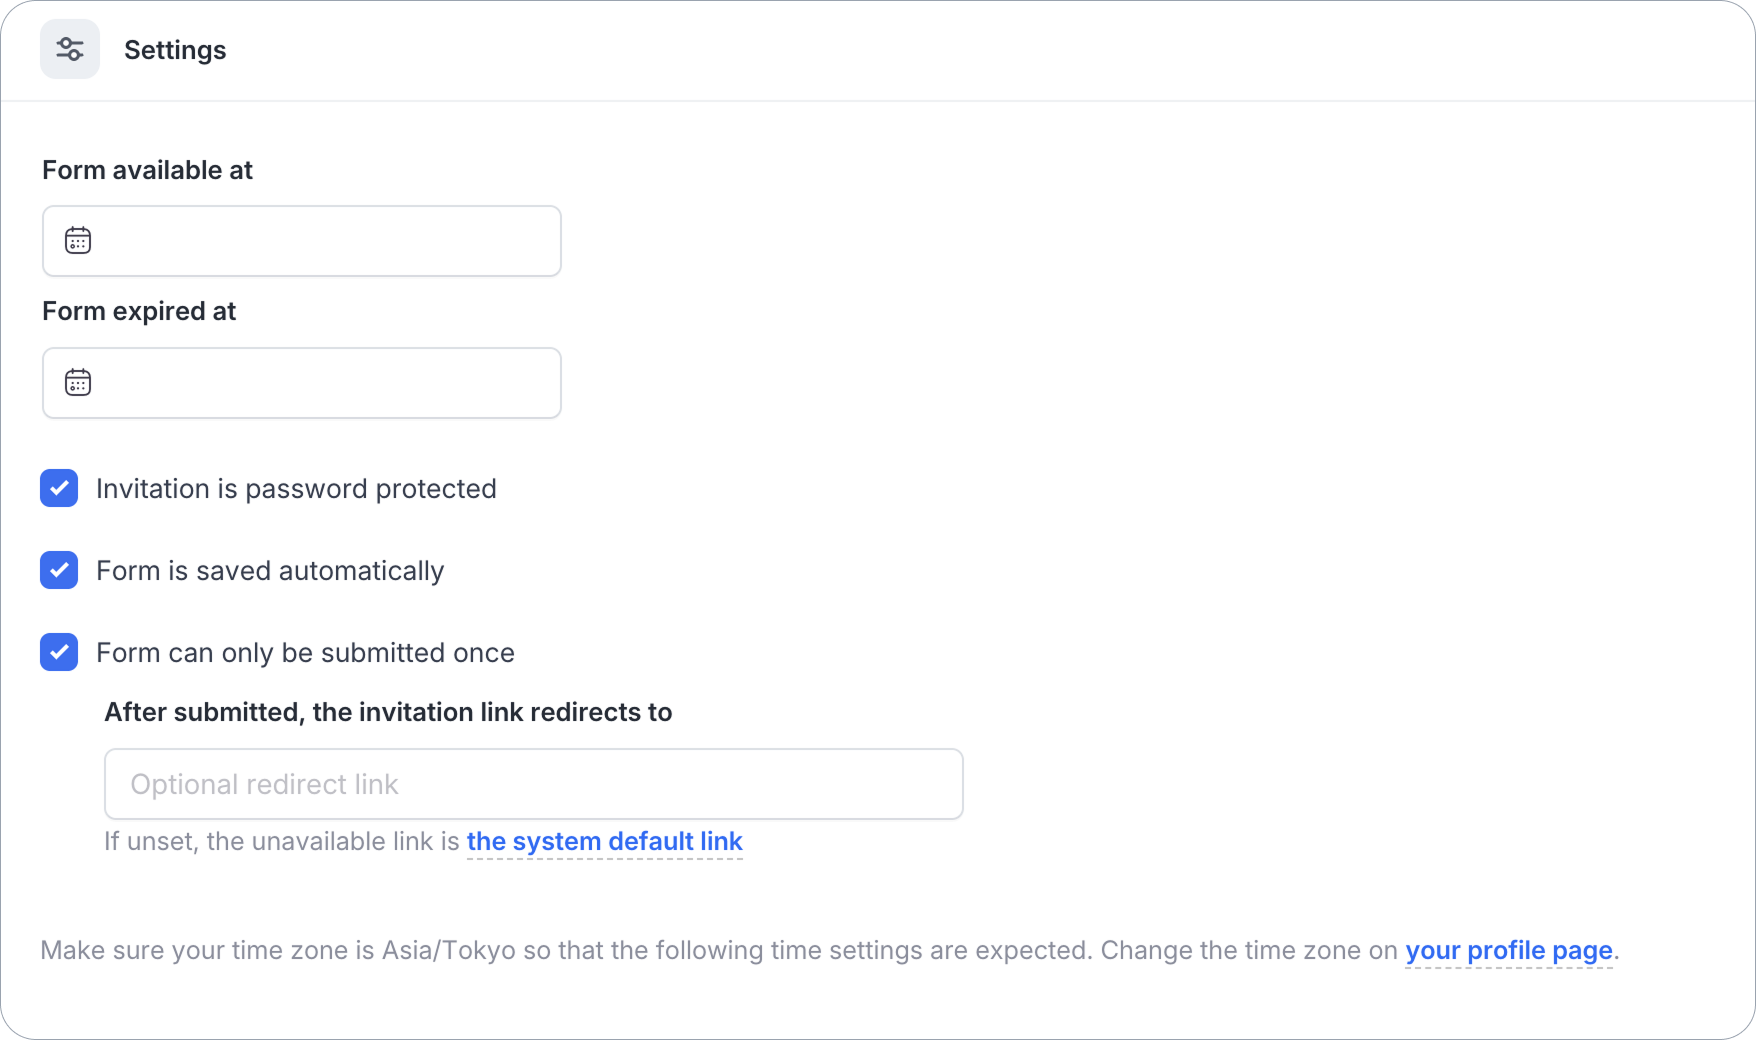
Limit submissions and redirect after submitting
In the Settings section at the bottom of the Invitations panel, you can also control:
-
Form available at / Form expired at: Set a time window during which the invitation link is active.
-
Invitation is password protected: See Set invitation password above.
-
Form is saved automatically: Save the recipient’s progress as they fill out the form.
-
Form can only be submitted once: Prevent the recipient from submitting the form more than once using the same invitation link.
When this is checked, an After submitted, the invitation link redirects to field appears. Enter a redirect link to send recipients to a specific page once they’ve submitted. If left blank, the system default link is used.
NoteMake sure your time zone is set correctly on your profile page, so the times above match what you expect.
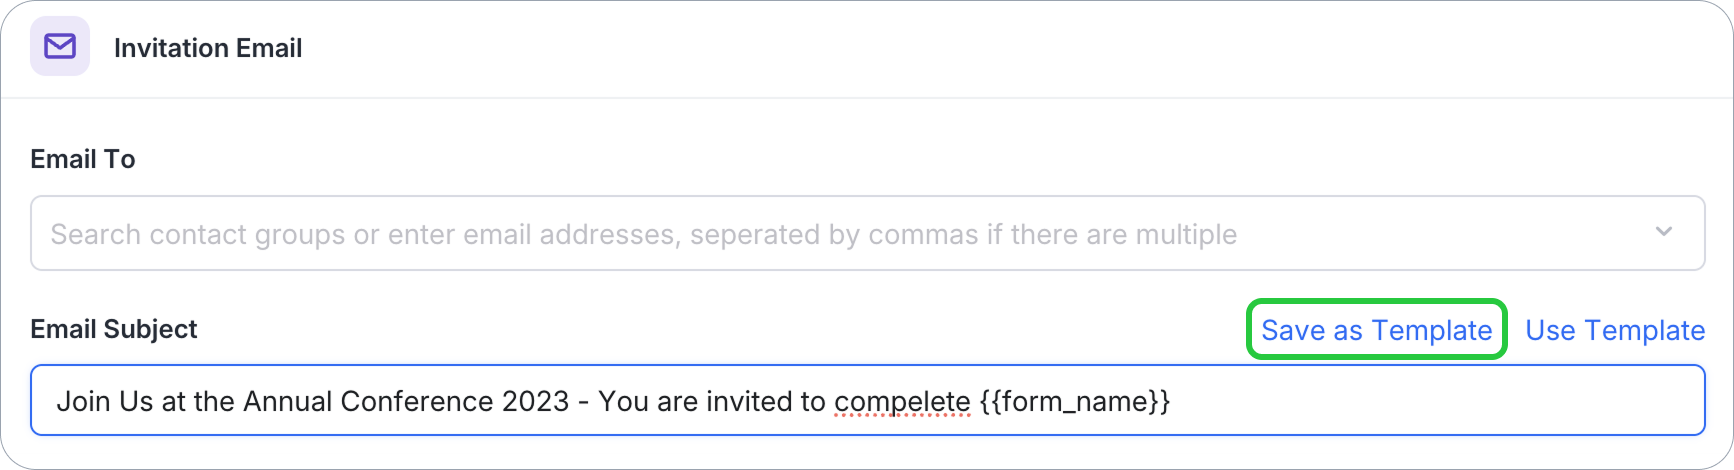
Create and reuse a template
You can save form invitation settings as templates to streamline the process of creating similar invitations for your team.
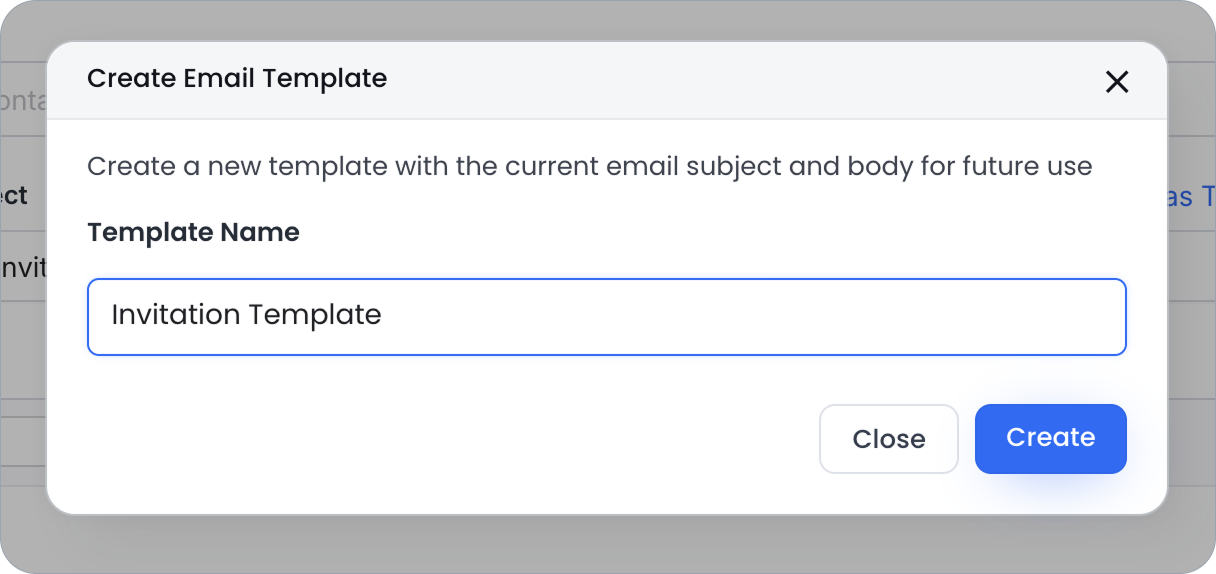
Create a template
-
After you’ve configured everything for the template, click Save as Template.
-
Name the template and click Create.
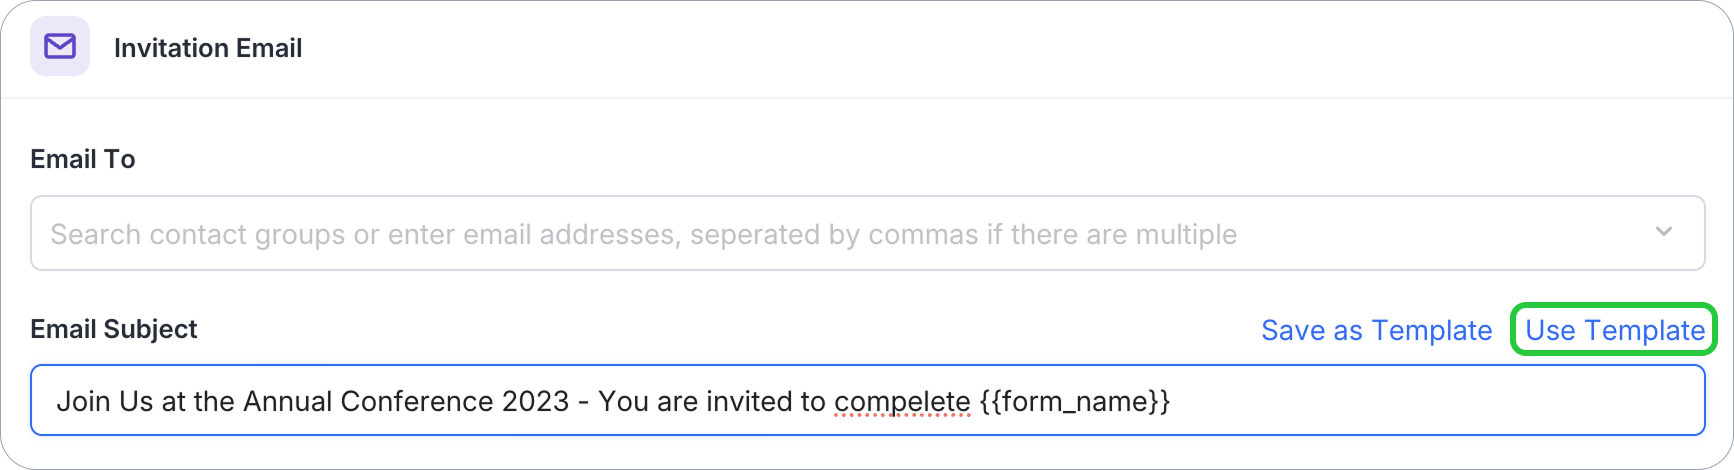
Reuse a template
-
Open the Invitations panel for your form (see Choose the invitation method above).
-
In the Invitations panel, click Use template and choose the desired template by name.
Send now or schedule

- For immediate sending, click Send Now.
- For scheduling future delivery, click Scheduled Send. You can set a date and time within the next 30 days.
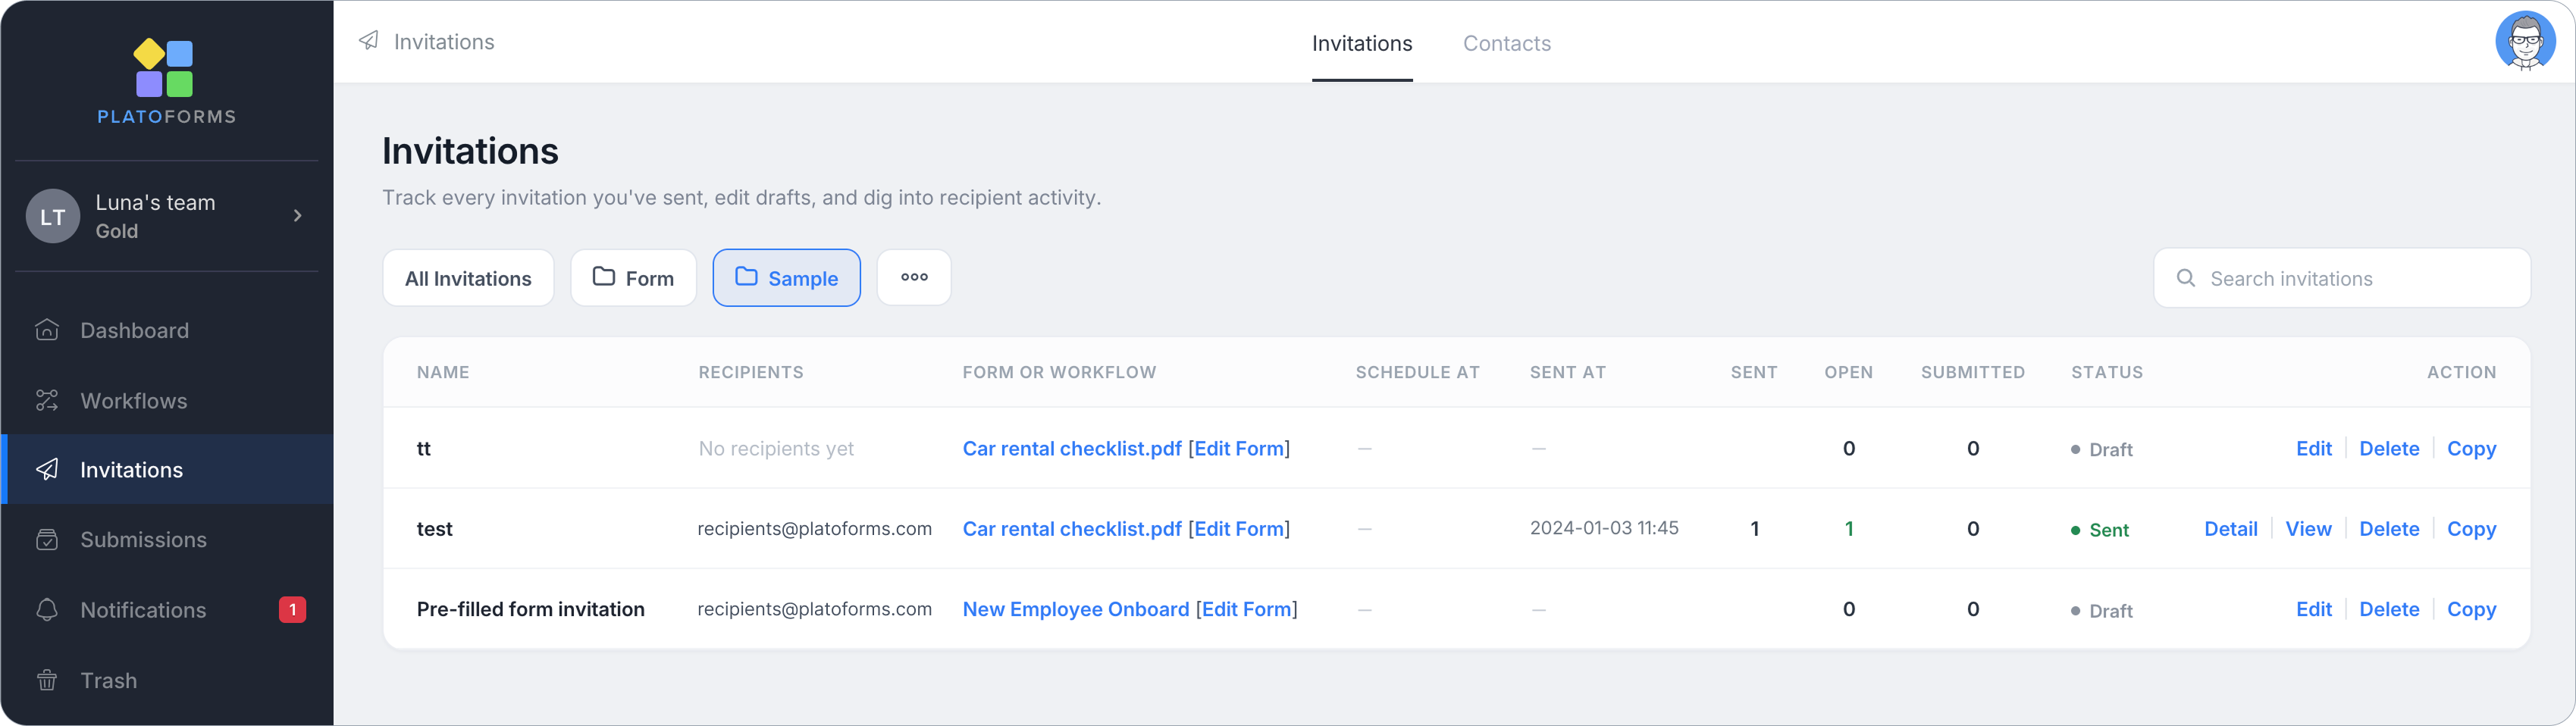
Track invitation records
After sending the invitation, go to the Invitations page (in the left navigation) to track every invitation you’ve sent, edit drafts, and dig into recipient activity:
- Use All Invitations, or filter by folder, or use the search box to find a specific invitation.
- The Invitations tab lists each invitation’s Name, Recipients, the source Form or Workflow it belongs to (with a direct Edit Form link), Schedule At / Sent At times, and Sent / Open / Submitted counts, plus its Status (e.g. Draft).
- Use the Action column to Edit, Delete, or Copy a specific invitation.
For details on managing sent invitations, see Manage invitations. To manage your contact list for bulk sending, see Contacts.