Manage form settings
Tabs
Configure everything from submission behavior to privacy settings. Learn how to customize confirmations, emails, access rules, form availability, and multi-language options to tailor the full form experience.
Open form settings
To open Form Settings, you can do either of the following:
-
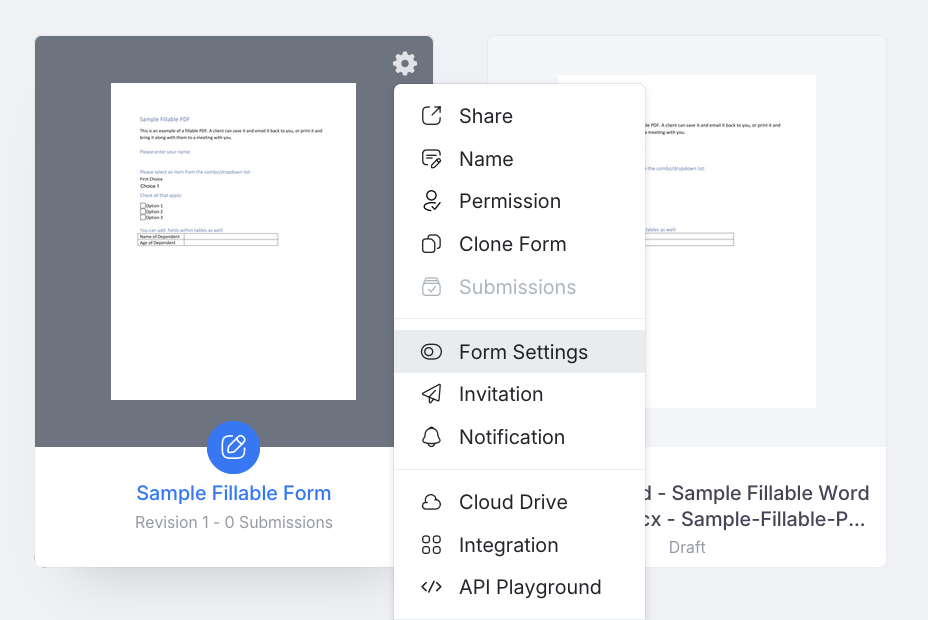
Option 1 (before editing): On the Dashboard, hover over the form, click the Settings (gear icon) at the top left, and select Form Settings.
-
Option 2 (while editing): In the form builder, click the more options (•••) icon at the top left, then choose Form Settings.
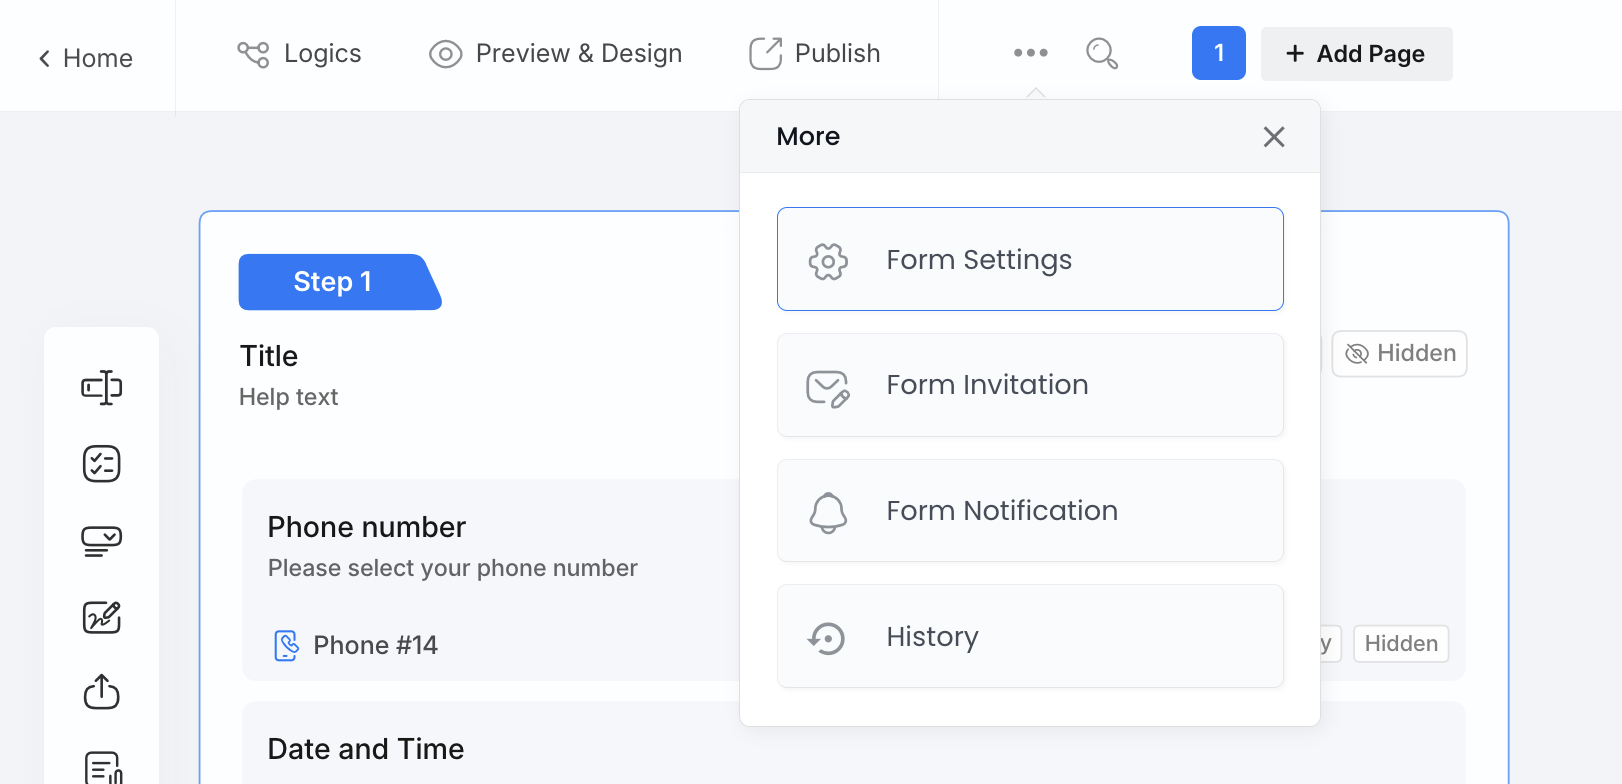
The Form Settings window includes four tabs: General, Submit Confirmation, Save Later Email, and Multi Languages. Each tab is explained in detail below.

General
The General tab provides the following options:
Tracking code
When Show tracking code on last page is on, a tracking code appears after the user submits the form.

You can use this code to find the submission on the Submissions page by entering it in the search box.
![]()
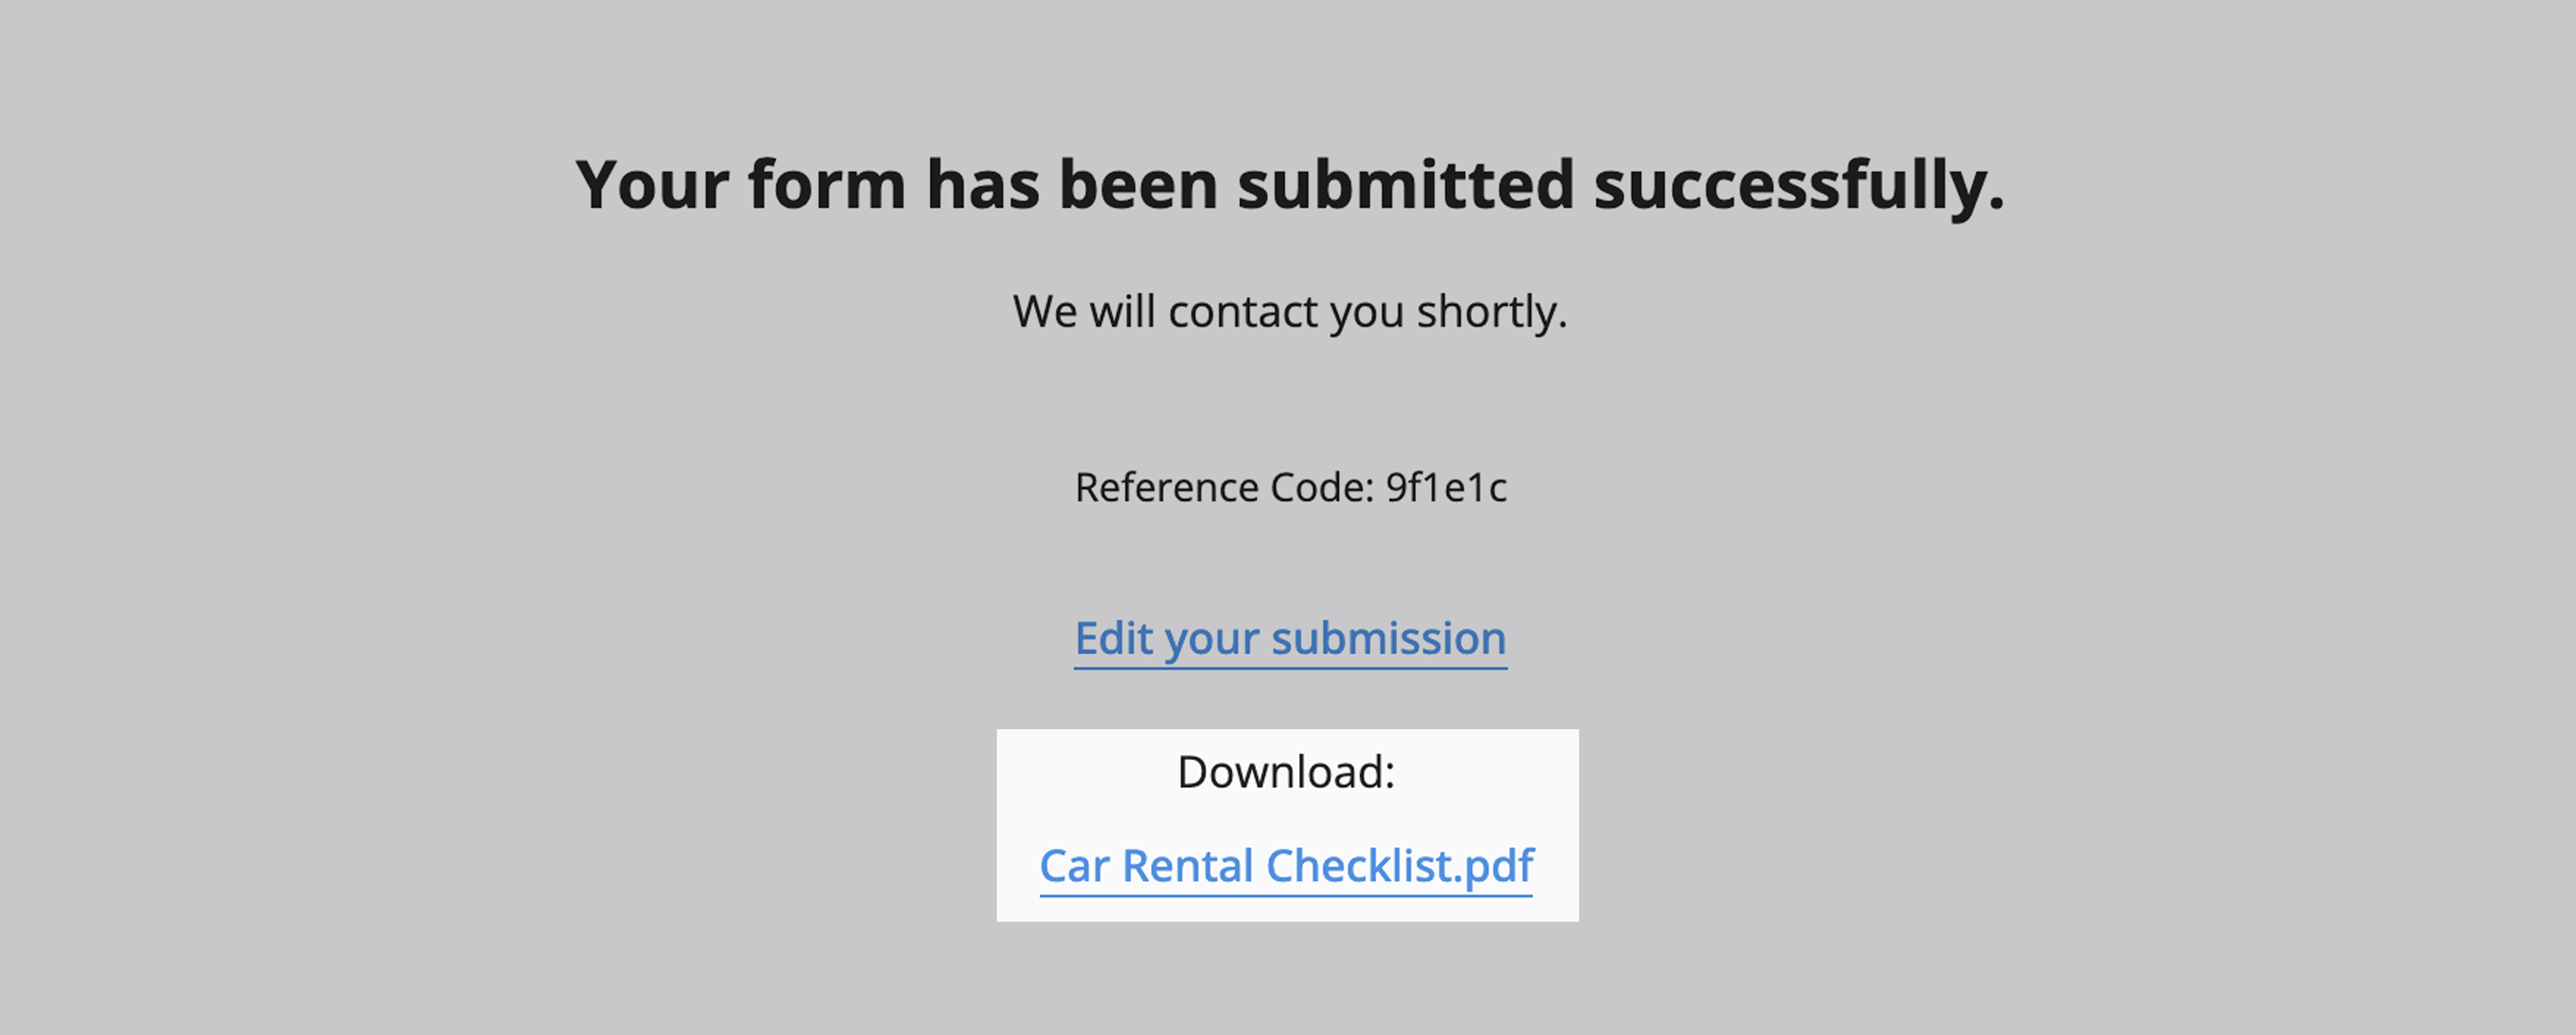
Edit submission
When Show “Edit Submission” on last page is on, users can edit and send the form again after submitting it. This is useful for making changes later.

Download completed PDF
Available only for web PDF form and online PDF form.
When Show “Download PDF” on last page is on, users can download a PDF copy of the completed form after submitting it.
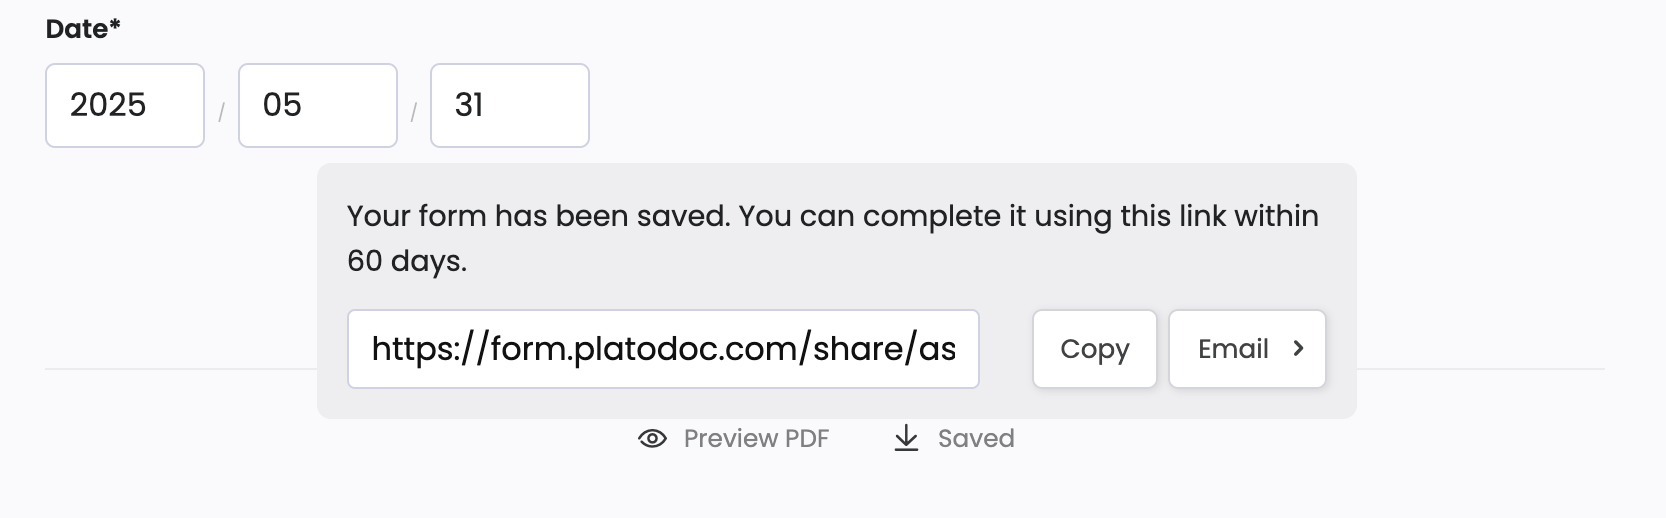
Save for Later
When Enable “Save for Later” is on, a Save for Later button appears.

Users can save their progress, get a save-for-later link, and return within the expiration time to finish and submit the form.
-
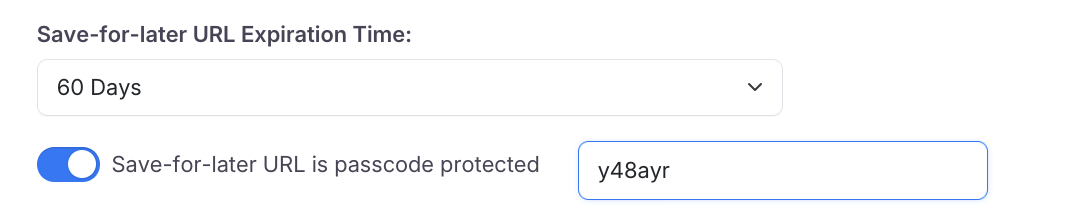
Save-for-Later URL Expiration Time
NoteTurn on Enable “Save for Later” first.
Scroll down to choose how long the save-for-later link stays active. Options include 1, 3, 7, 30, 60, 90, 180 days, or never. Once it expires, the link can no longer be used.
-
Save-for-Later URL is passcode protected
NoteTurn on Enable “Save for Later” first.
When Save-for-Later URL is passcode protected is on, users must enter a passcode to revisit their saved form using the save-for-later link.
Preview PDF before submission
Available only for web PDF form and online PDF form.
When Preview the PDF before submitting is on, users can view a PDF preview of the completed form before submitting it.

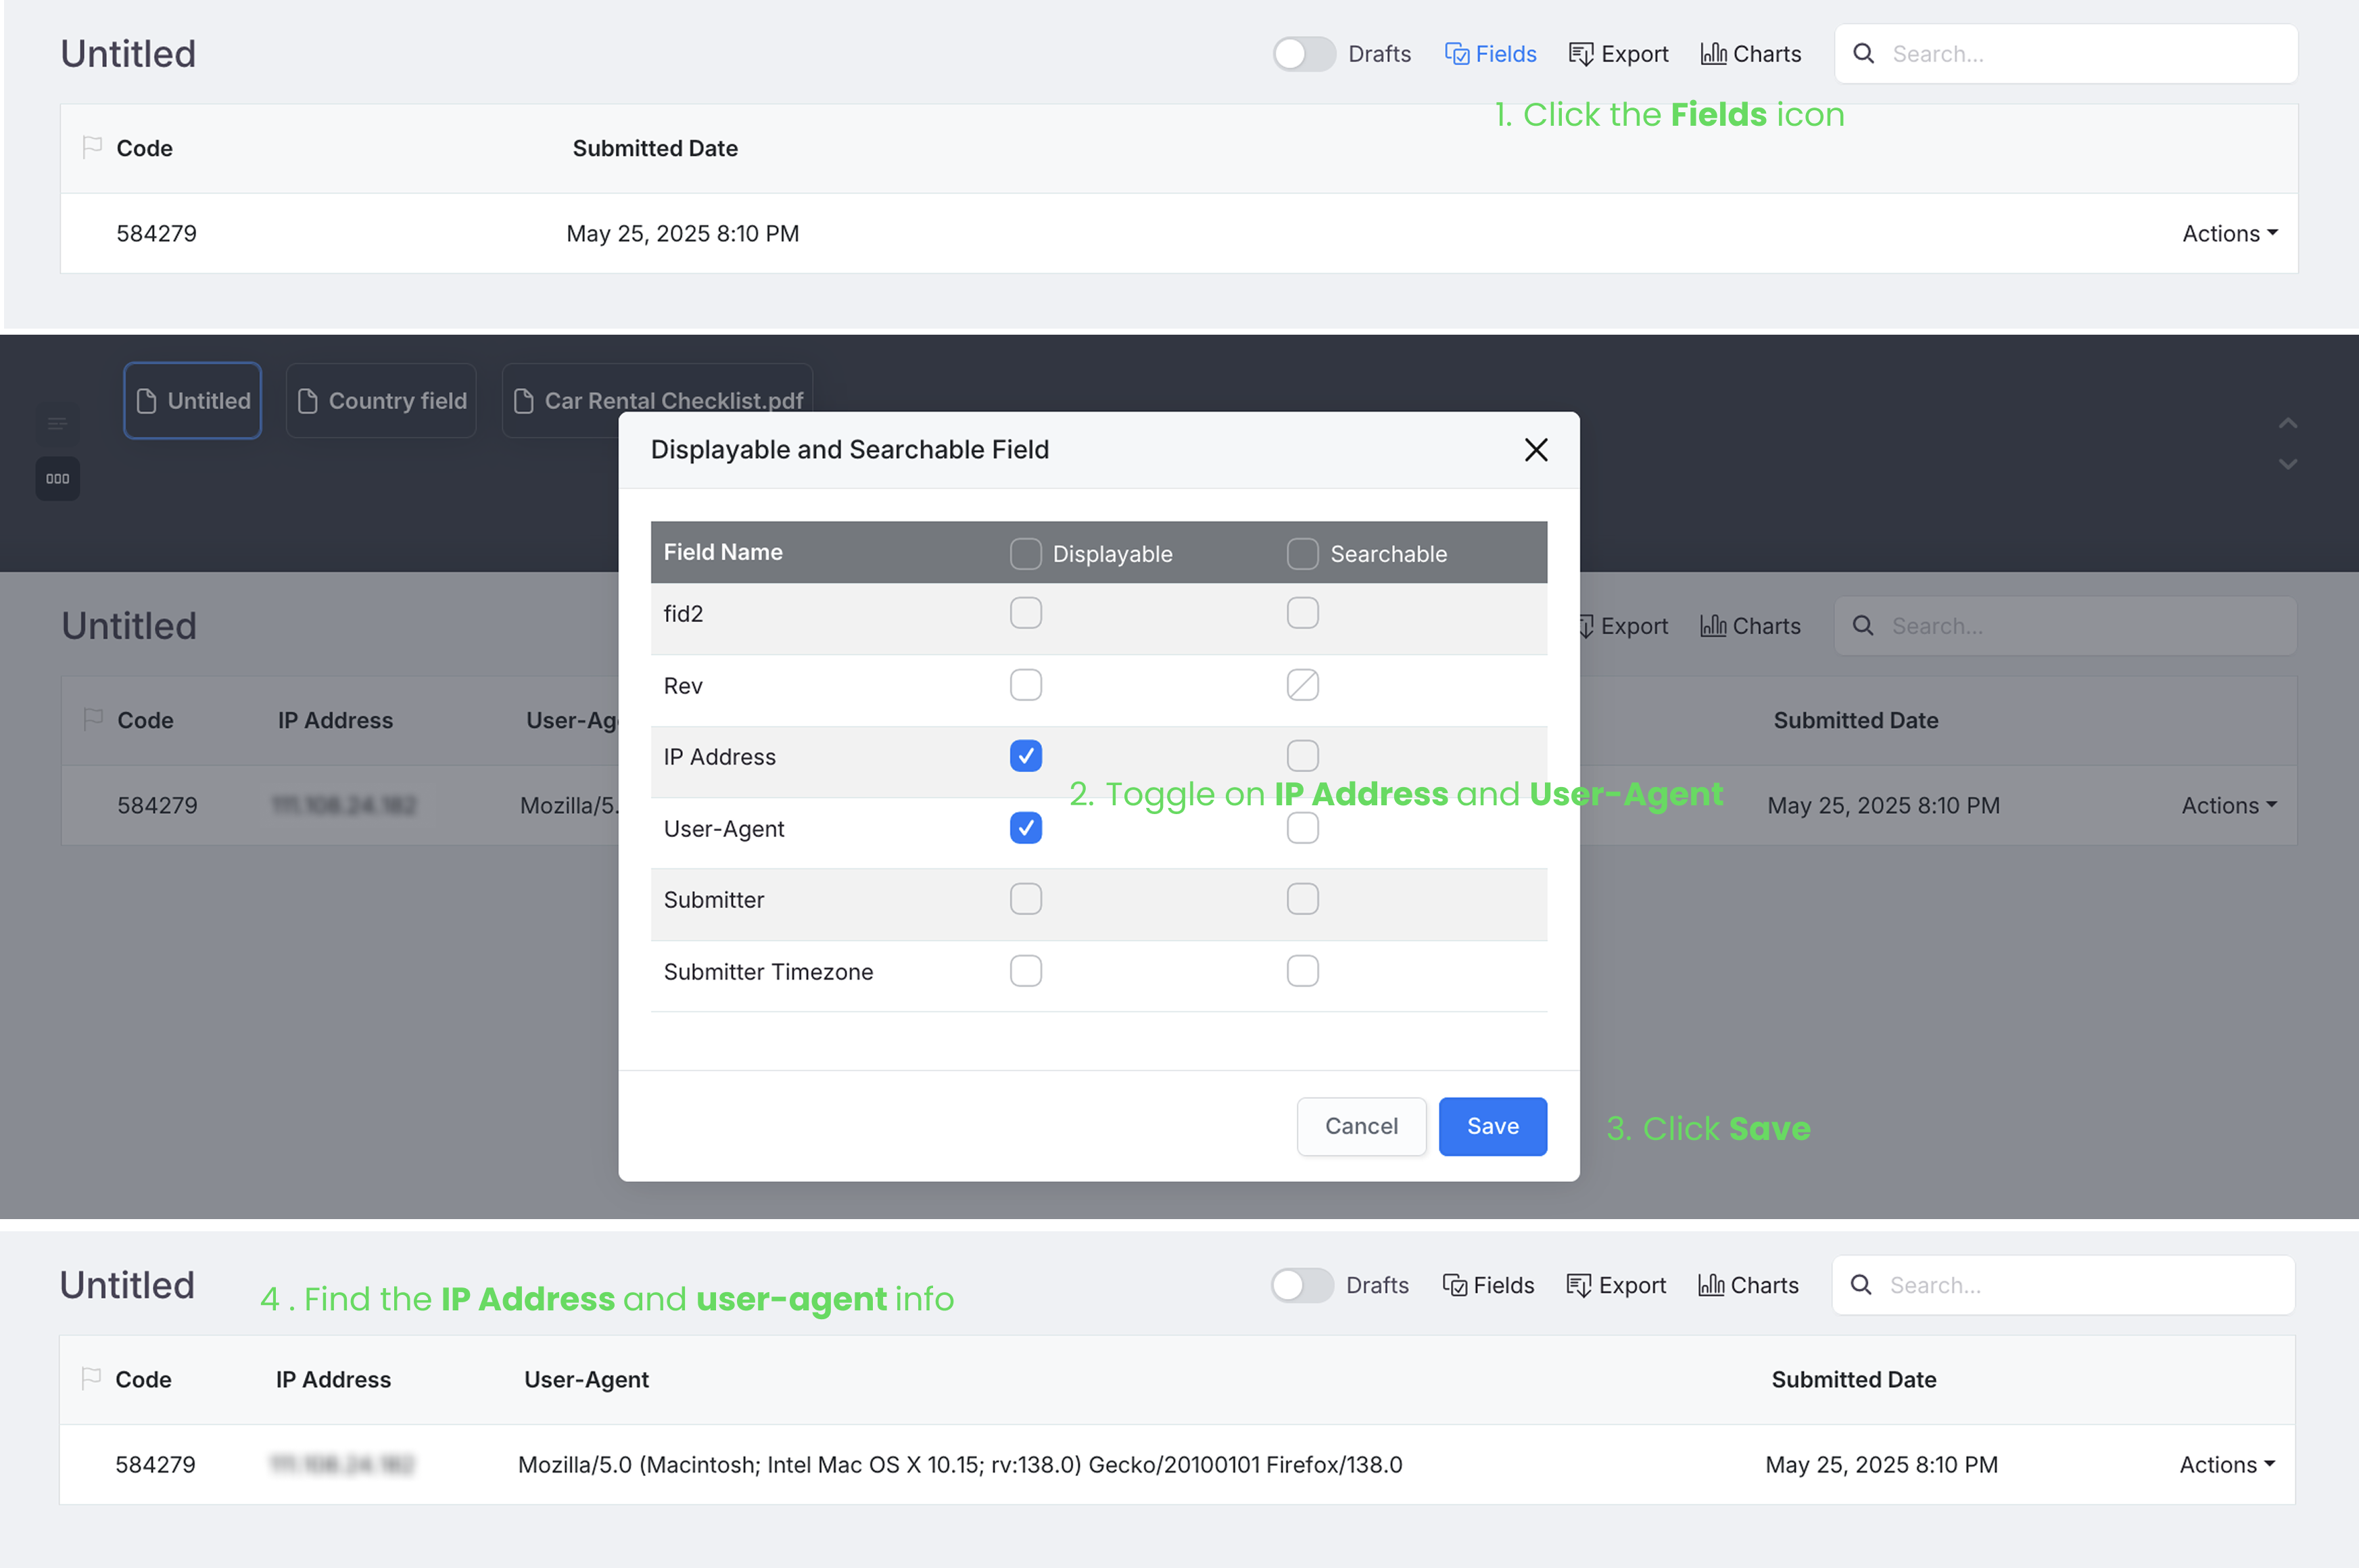
Collect IP address and browser info
When Collect IP address and browser’s User-Agent from submitter is on, the form will gather the submitter’s IP address and browser details.
This is especially helpful for forms with e-signatures.
To see the collected data on the Submissions page, make sure IP Address and User-Agent are set to display in the Fields settings.
Preserve uploaded file original name
-
When Preserve uploaded file original name is on, the uploaded file will use the label of the File Upload field as its name. This name will appear when you download the file from the Submissions page or upload it to a Cloud Drive.
-
When this is off, the file keeps the name given by the user.
WarningIf your form has more than one File Upload field and the user uploads files with the same name (like
my-file.png), one file may overwrite the other in the Cloud Drive. To avoid this, suggest in the Help Text that users give each file a unique name.
Set form passcode
When Form is passcode protected is on, a single passcode will be assigned to your form. Users need to use this passcode to access the form by clicking on its published URL.

- Form passcode stays constant when accessing the form via its published URL. In simpler terms, the published URL is common among users, along with the connected password.
- The Invitation password is provided with each invitation. For instance, when sending out 10 invitations, every recipient gets a distinct invitation URL and password.
For more details here.
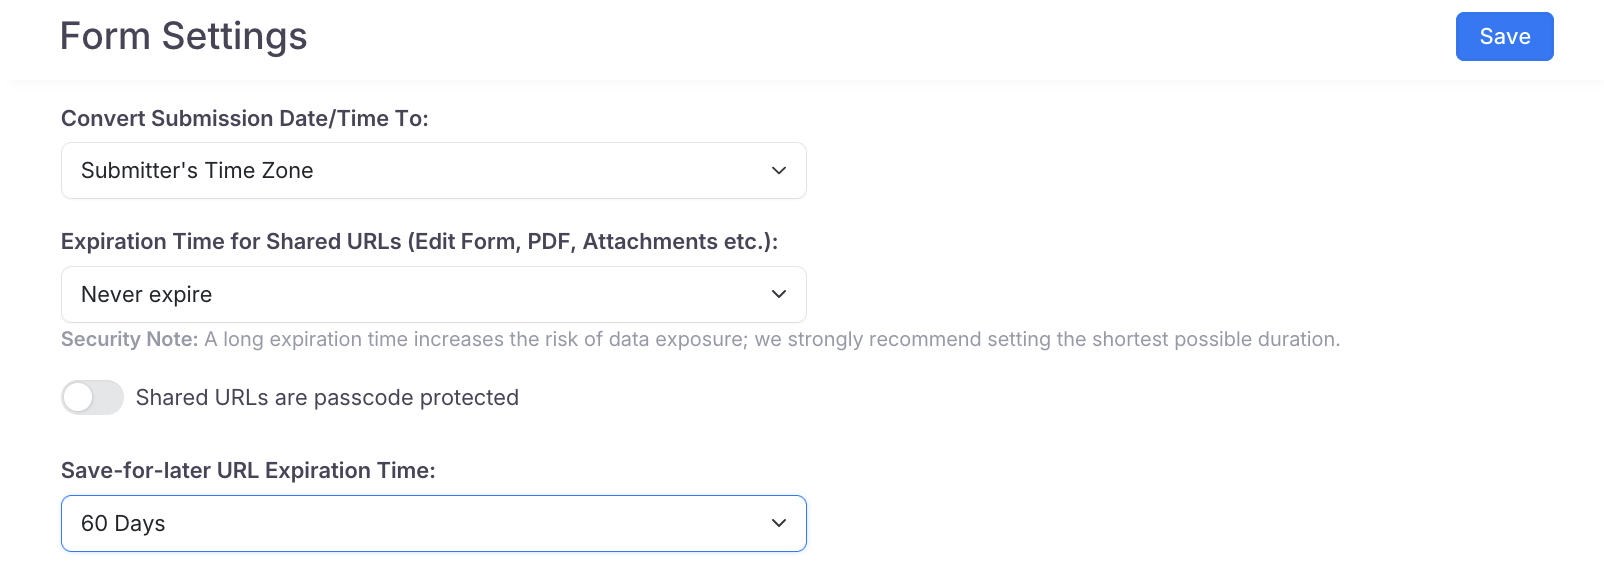
Convert submission data/time
Convert Submission Date/Time To lets you choose how the submission time is shown—using the submitter’s time zone, your time zone, or a custom one.

To see the converted time on the Submissions page, your form must include a date field—either a Date (MM/DD/YYYY) or a Date and Time field (MM/DD/YYYY hh:mm:ss). Time-only values aren’t supported. Make sure this field is enabled in the Displayable and Searchable Field settings.

This setting lets you choose how to display the submission time:
-
Submitter’s Time Zone: Shows the time based on the respondent’s local time. For example, if someone in Shanghai submits the form at 1:00 AM on April 29 (Shanghai time), this exact time will appear in the submission.
-
Form Creator’s Time Zone: Converts the time to your time zone, based on your current time zone. For example, the same submission would appear as 1:00 PM on April 28 if your time zone is New York.
-
Custom Time Zone: Always shows the submission time in the time zone you select.
- The Submitted Date shown in the list view of the Submission page always uses the form creator’s time zone.
- This setting does not affect already generated PDFs.
- The Submitter’s Time Zone is automatically detected from the browser. For example, if someone’s profile is set to Beijing time but they are in Sydney, the system will detect Sydney.
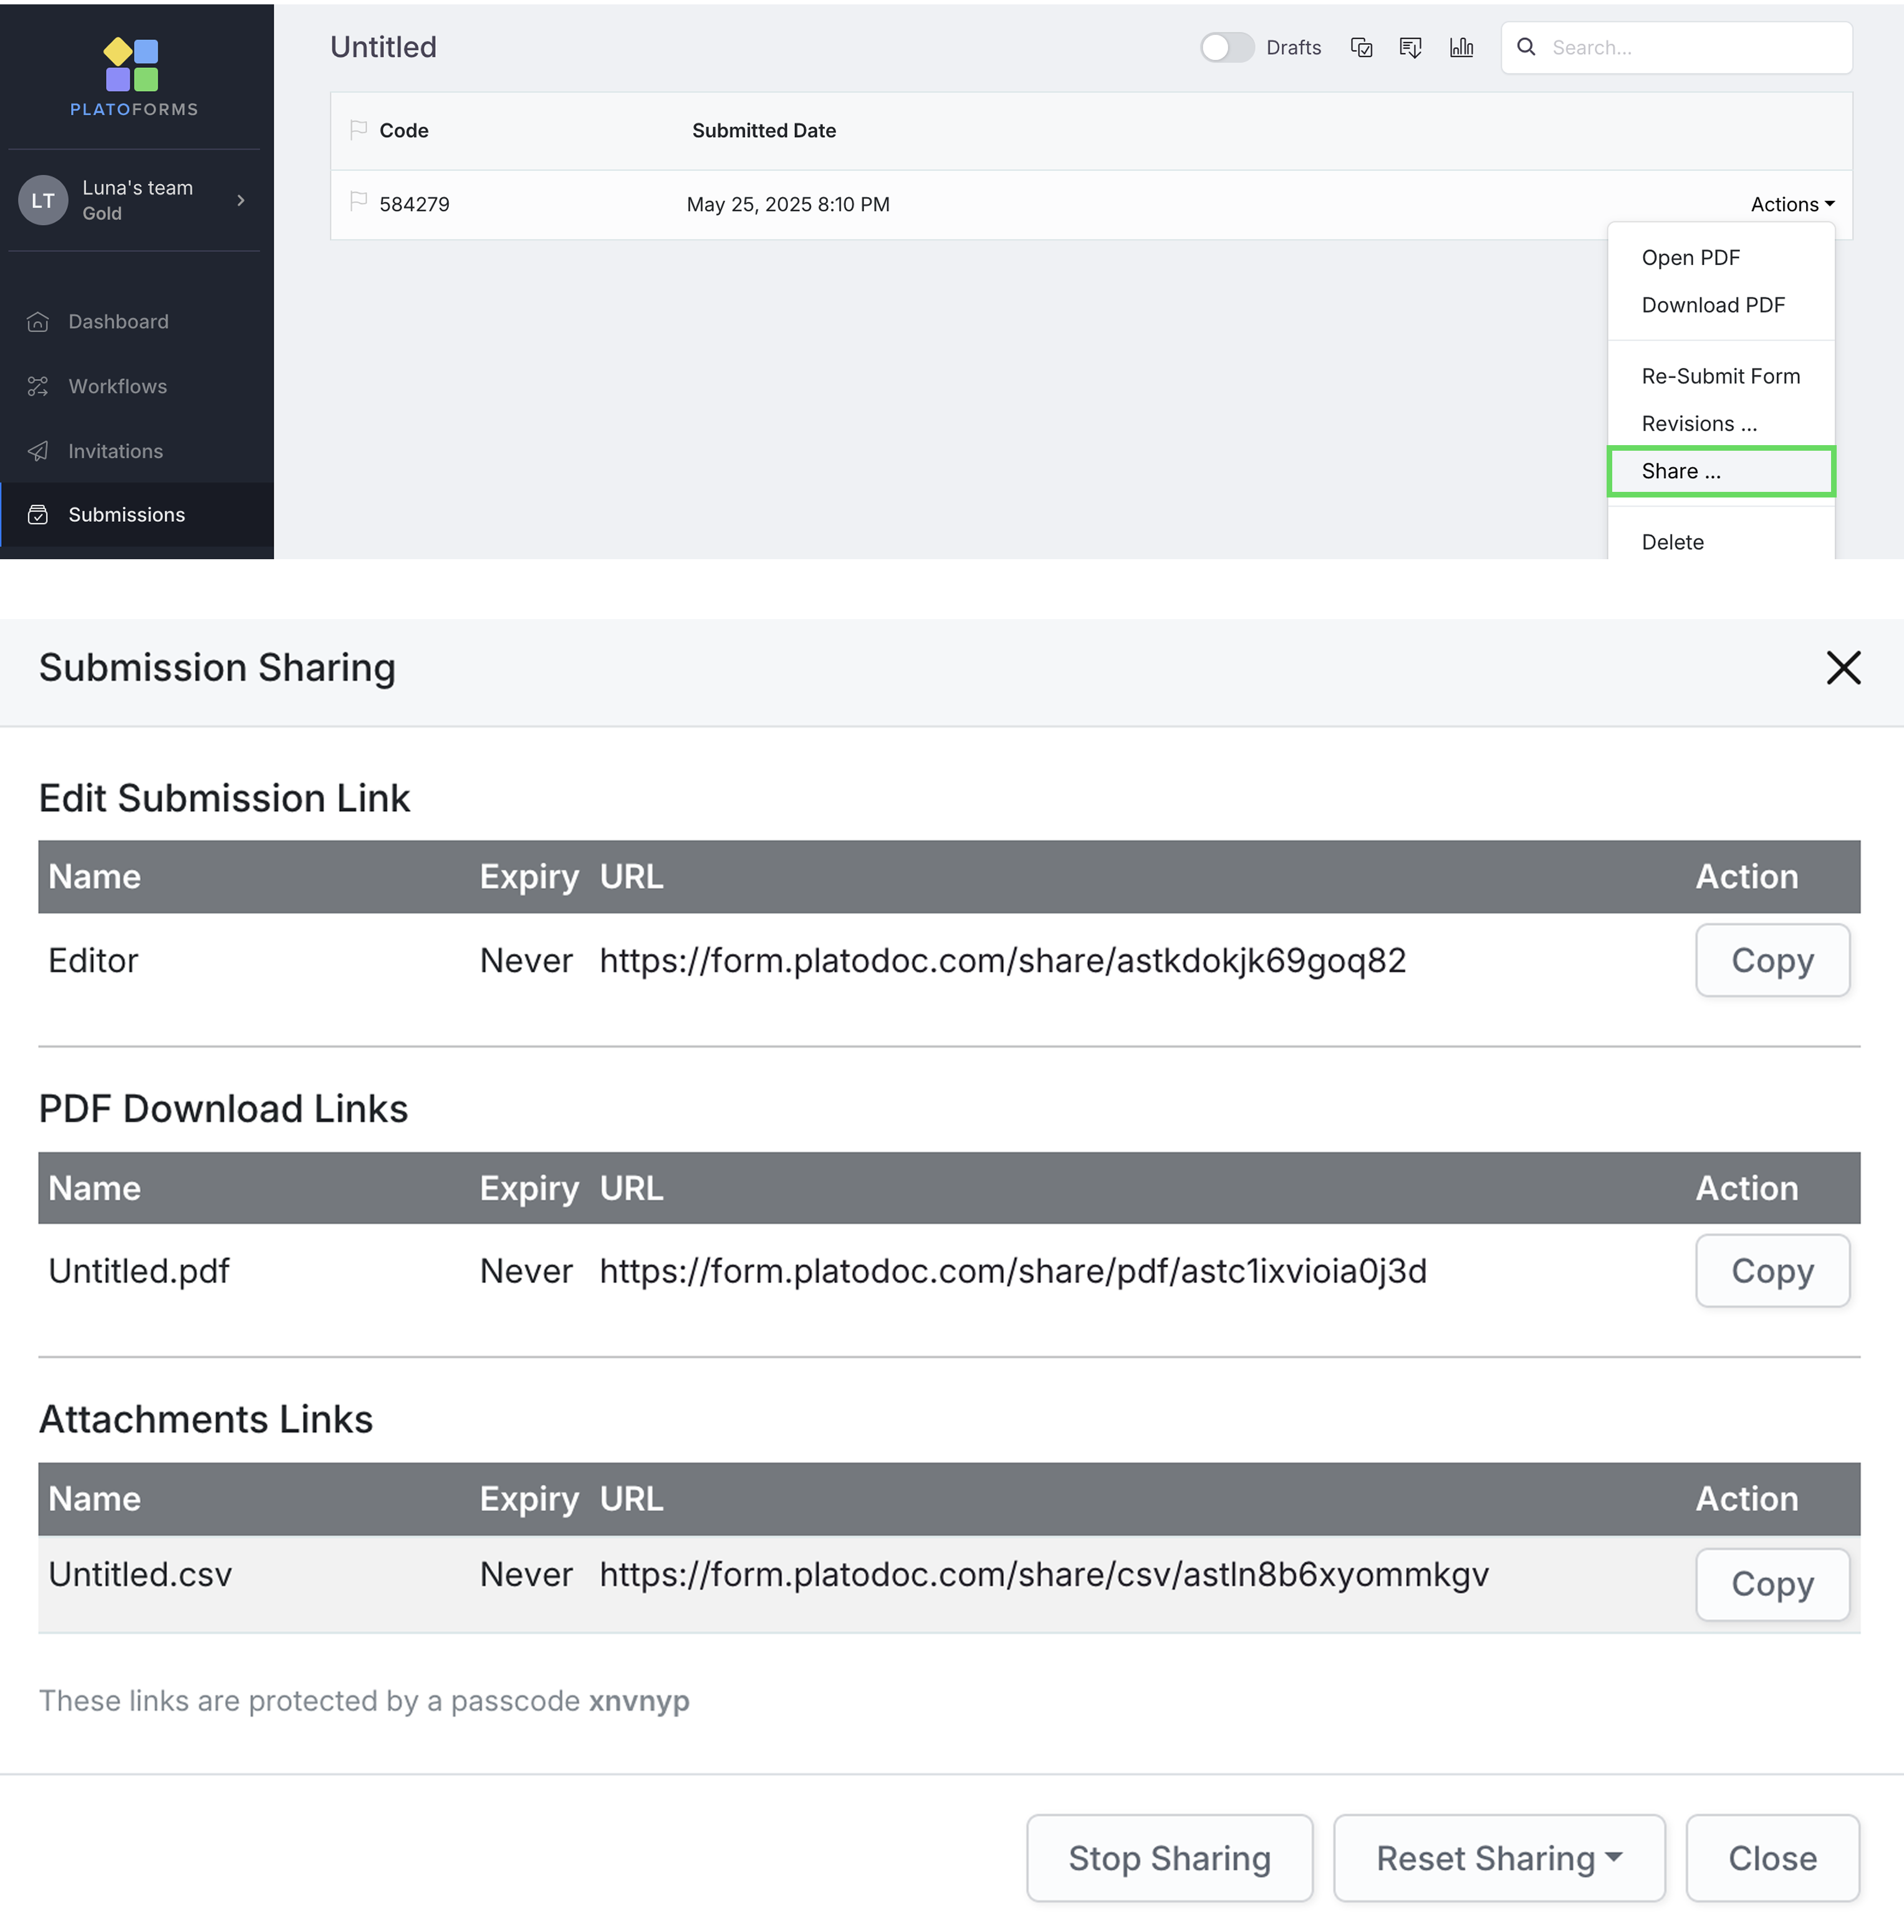
Shared URL passcodes
When Shared URLs are passcode protected on, links like “edit Submission”, “PDF download”, or “attachments” will need a passcode to open. These links are available in Submissions page > Actions > Share > Submission Sharing panel.
Expiration Time for Shared URLs
Expiration Time for Shared URLs lets you control how long shared links (Edit Form, PDF download, or attachments) stay active. You can choose from 1, 3, 7, 30, 60, 90, or 180 days—or set them to never expire. Once expired, the links will no longer be accessible.
Longer expiration times increase the risk of data exposure. We strongly recommend choosing the shortest duration necessary.
Form available at

Set when the form becomes accessible. For example, if you choose 2025-05-06 12:22, users won’t be able to open the form until that exact time.
You can also set a Redirect link before available—users will be taken to this link if they try to open the form too early. If you don’t set one, a default system message will appear instead.
Form expired at

Set when the form will stop accepting submissions. After this time, users won’t be able to access the form.
You can set a Redirect link after expiration to take users to a specific page (such as a thank-you or waitlist page). If not set, the default system message will show.
Submission limit
Set a maximum number of submissions (any number above 0) for your form.

Once the limit is reached:
-
Users are redirected to your custom URL (e.g., a waitlist or promotion page).
-
If no URL is set, they’ll see the default system message.
-
The form can automatically unpublish and switch to Draft if you enable this option.
Submit Confirmation
In this tab, you control what happens after someone clicks Submit on your form. By default, a success message appears—but you can customize it or redirect users to another page (like your website).
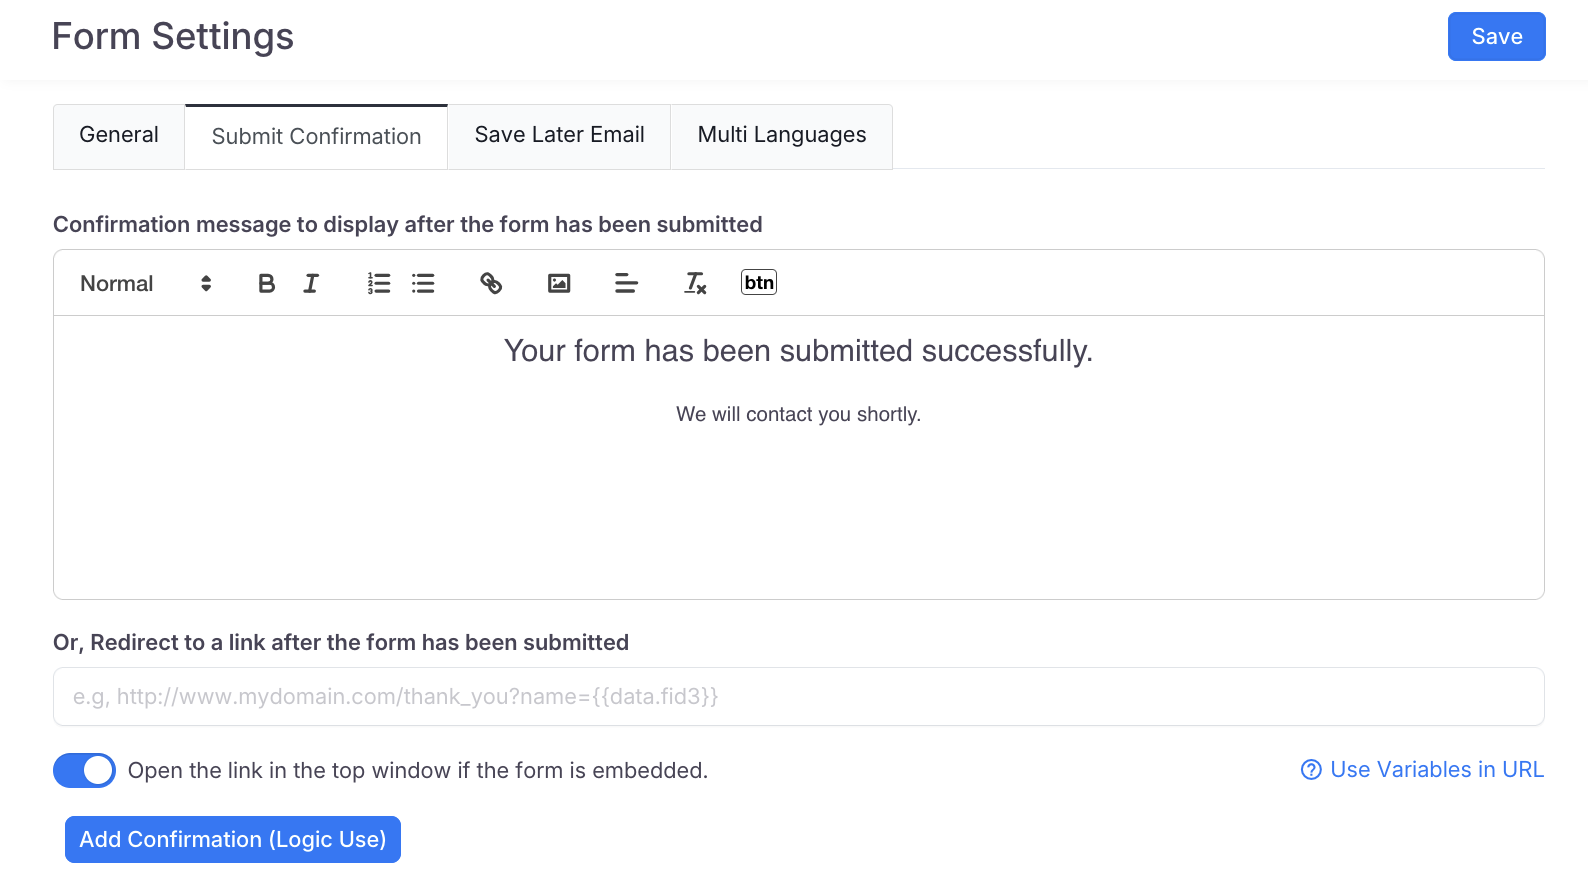
You can include in the message:
-
A unique code to help identify the submission on the Submissions page.
-
A link users can revisit and reuse to edit their submission.
-
A link to download the submitted form as a PDF.
Use variables in redirect URLs
On the Submit Confirmation tab, if you choose to redirect users, you can include variables in the URL.
For instance, if you wish to transfer the customer’s name from input field #3 to your redirect URL (let’s say it’s https://yourdomain.com/) using the parameter name customer_name, the URL format would be: https://yourdomain.com/customer_name={{data.fid3}}.

Notably, you can also include {{tracking_code}} or {{submission_id}} as a variable in the redirect URL. For example:
https://yourdomain.com/customer_name={{data.fid3}}&track={{tracking_code}}.
This lets you customize the redirect based on user input and utilize tracking codes as needed.
Add Confirmation
You can click Add Confirmation (Logic Use) to add different confirmation messages or redirect users to different pages—based on their answers.
For example:
-
Redirect job applicants to different thank-you pages by role.
-
Show a custom message based on selected department or program.
Save Later Email
In this tab, you can customize the Email Subject and Email Body for the Save for Later feature.
For example, you can include {{draft_url}} in the Email Subject.

When the user clicks Send in the Save for Later pop-up:

The receiver will get your custom email with a link to continue filling out the form later.
Multiple languages
On this tab, you can configure the form to be compatible with multiple languages. For more details, refer to the Enable multi-languages section.